I was asked recently, for the first time in my life, to build a custom telephone niche.
Now, what, you may ask is a telephone niche?
Well, long prior to these Apple iPhones we all carry and even before cell phones existed (yes, there was such a time) we all called each other on telephones connected to a wire in the wall. That was back when dinosaurs roamed the earth and people had just discovered they had opposable thumbs.
Back in those days (olden times) people needed places to set their telephones where they would be accessible but still be out of the way. Telephone niches were the means to handle that problem.
When this customer (we will call her Ardyth) contacted me she emailed a string of photos of old-style telephone niches. She asked me if I could custom build her a craftsman style niche close to what was in one of the photos.
I gave her a quote which included the drawing on vellum shown above. Vellum is an old-fashioned paper draftsmen and artists use for drawings or blueprints. Nowadays drawings are most often made with computers. But I still hand draw on vellum or on Mylar. Old fashioned drafting tools for an old-fashioned looking product – perfect.
The carpentry was pretty straightforward. The niche was essentially, a box to insert into the wall, with decorative elements to give it character.
This design included a stylized flower on the front. The panel for that flower is ¾” thick red oak. I drew it on the wood by hand. Then I cut out the flower and its two leaves with a small bandsaw. Then I hand sanded the cut edges to mostly smooth. Finally, I stained the piece and gave it a gloss finish.
Ardyth was wonderfully happy with the finished piece. She left me a great review and shared a photo of the niche with one of her beautiful antique phones displayed in it.
Thank you Ardyth, for the chance to build you a nifty niche!
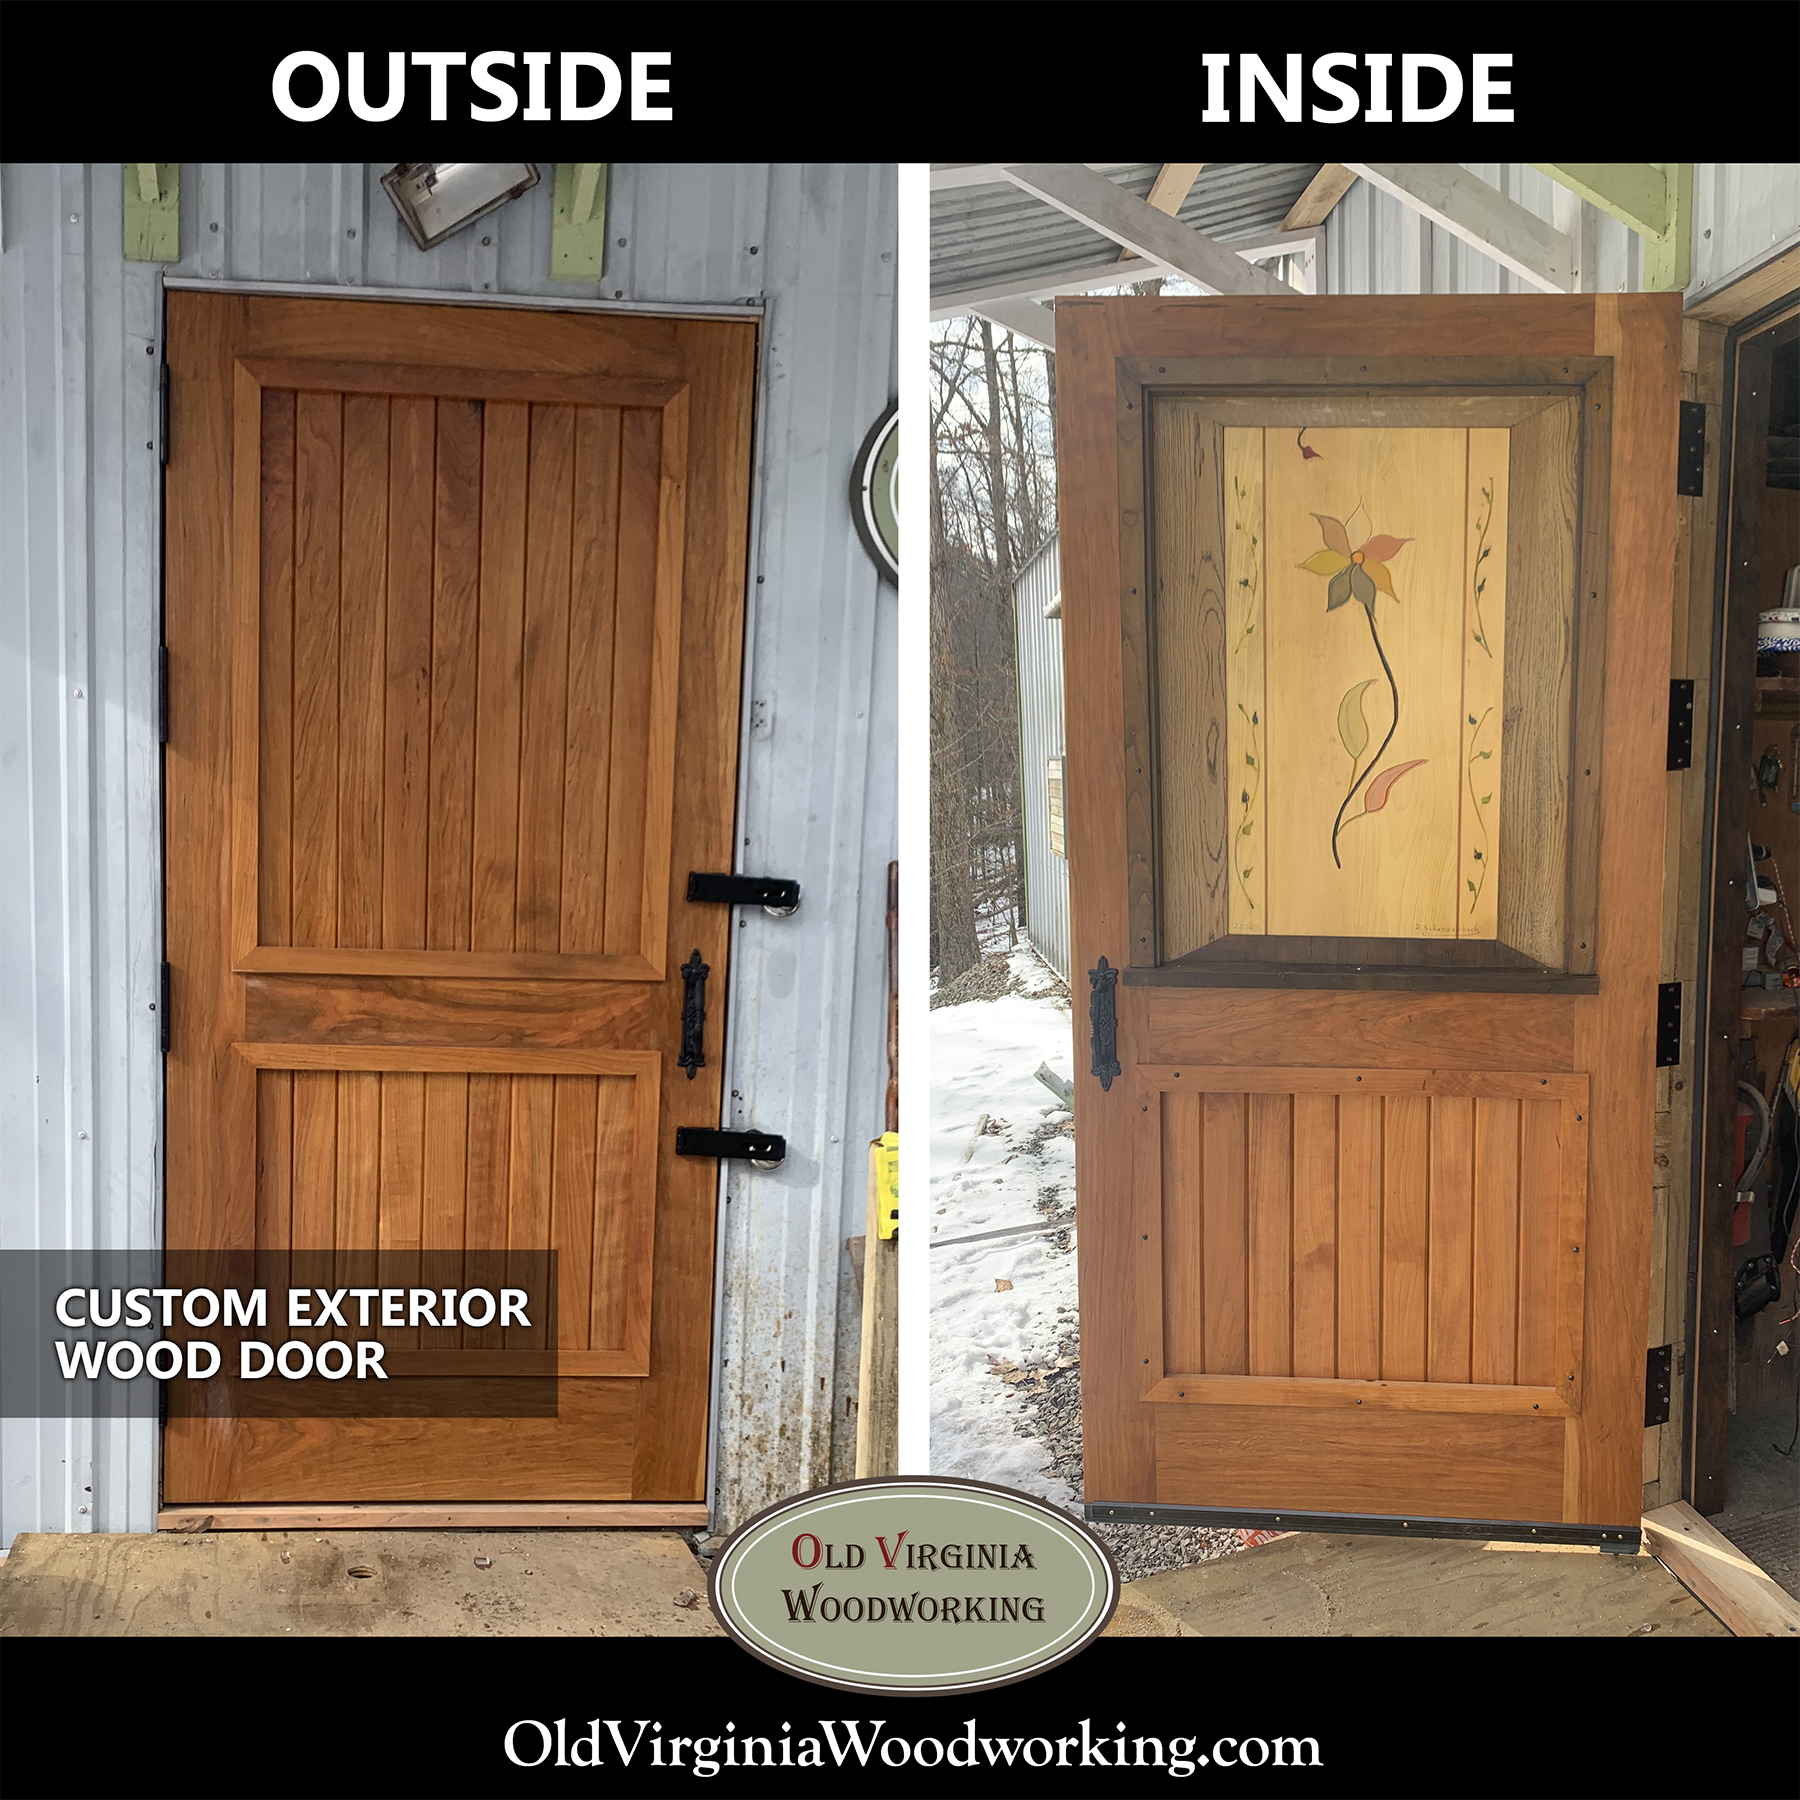
My new shop door (Man Door as some blueprints would label it) was in the planning for quite a while.
At thirty-eight years of service, the old, smooth-faced steel door, was well past its to-be-used-by date. One weird thing about those cheapie hollow steel doors is that they have an interior frame of pine. The manufacturers have some way of stamping out thin sheet metal and wrapping it around the frames. That’s all good and great but inside that sheet metal cocoon, moisture condenses, soaks the wood frame, and rots it out. Kinda like a chocolate covered cherry with the cherry rotten. It can look well enough on the outside but the inside disappoints. Hence, the hinge screws were no longer holding and the door was ready to fall off the building.
The Old Virginia Woodworking shop needed a new exterior door.
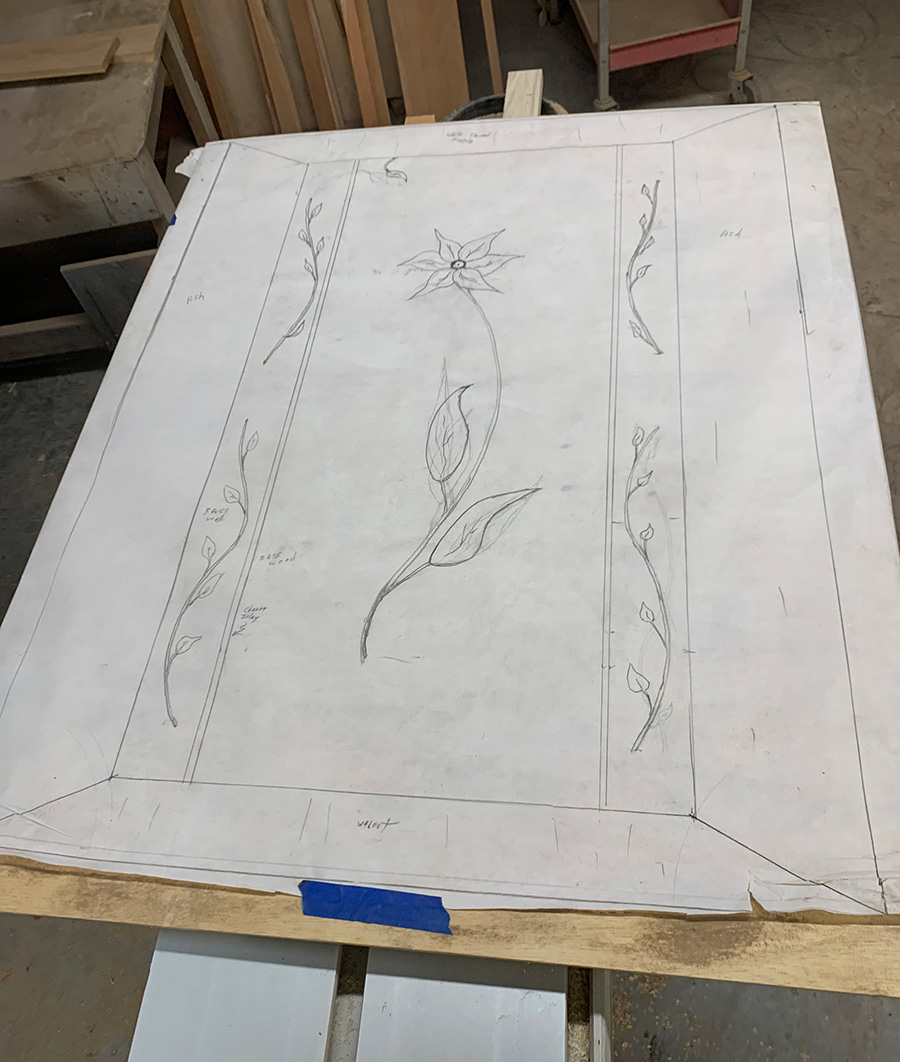
I toyed around with ideas for quite a while, wanting to build something that would improve the look of the shop. I have a large easel, so I set up a tablet and started sketching. Artsy projects attract me. I wanted to make something that would catch the eye but not be crazy strange. After drawing several sample designs, I came up with the flower and vines you see in the photos here (more on the design below).
I want people who visit my shop to see something lovely when they drive up, and I want to see something lovely every day when I go to work.
Making the door
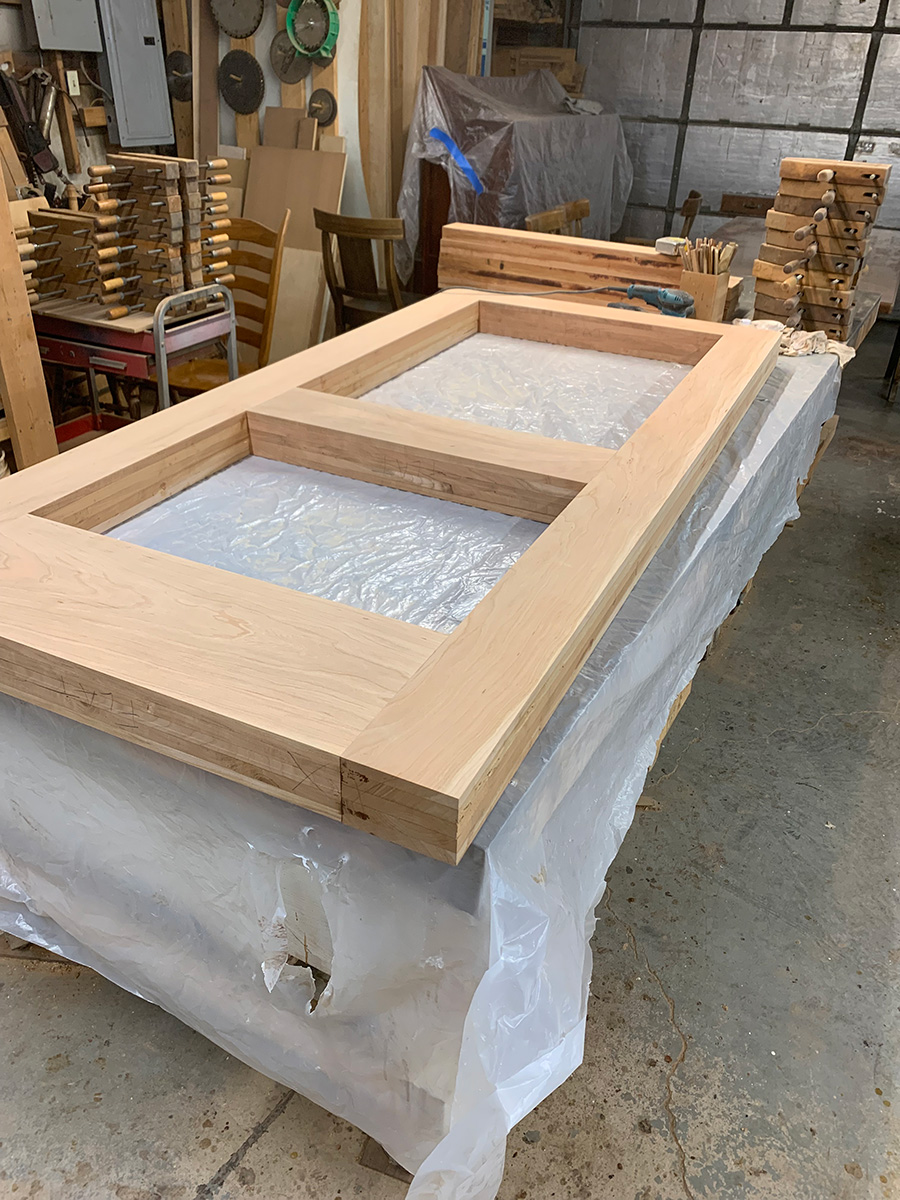
Before working on the art panel, we had to build the main frame of the door and the plain panels for the other sections of the door.
We wanted to build a door that would 1) be cool to build and 2) was visually impressive. That is why the door is almost 4” thick. It took five layers of glued up cherry boards to make this beast.
I had a few pieces of ropey cherry that I had acquired at an auction. Ropey cherry is just cherry wood with a slightly loopy grain. It is clear of knots, very classy, and I had several wide beautiful boards of it.
When we glued up this 4” thick board sandwich, we faced all the outside with beautiful ropey cherry. The inner boards had quite a few knots, but they are invisible under the better boards – call it a knotty cherry sandwich with ropey cherry bread.
Next we milled up the stiles and rails for the door and prepared them for assembly. We dowel all our custom doors together. On this big exterior door we drilled double the usual number of dowel holes — well over 100, 2.5” long dowels. Then we used a slow-drying epoxy to assemble it which gave us plenty of working time for the adhesive before we had to be done clamping it up.
At this point it was a door frame with no panels in it.
At an almost 4” thickness of solid cherry, this frame was pretty darned heavy. From here on we had to have two or three men to move it around or to flip it over on the benches.
I decided to put vertical 4” wide panels in the outside upper and lower panels. I have found that, with almost any design work, narrow lines create a dressier, classier look. That idea carries through from architectural applications even down to what we wear. After all, which shirt is dressier, the one with the narrow stripes or the one with the wide stripes? I am not a fashion consultant, but I think I got this right, the narrow stripes.
Andy, my faithful assistant, glued up the thicknesses of wood needed and fashioned the panels. The lower panels are the same thickness as the door. The upper panels are half the door thickness. The decorative panels only show on the outside of the door. He did a great job as you can see.
At this point the door was almost bullet proof as a few of our customers liked to mention.
Creating the decorative art panel
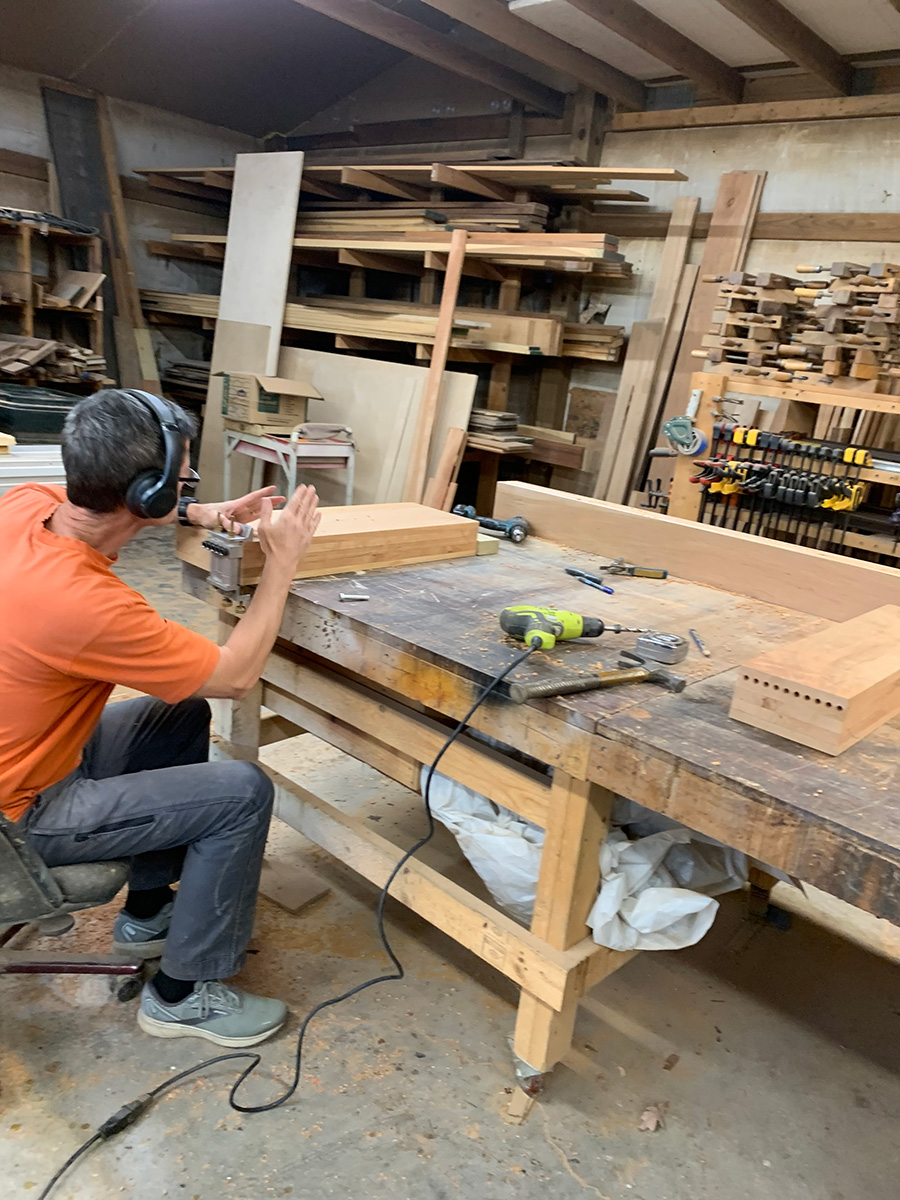
With the rest of the custom door assembled, the art panel for the inside upper section was all that was left. I designed and built that panel with my own hands.
I started by drafting a full-size drawing on vellum. By this time, I pretty much knew what I was going to do so it really did not take very long. The panel itself is made of bass wood (for ease of carving) and then two vertical stripes of cherry.
After gluing it all up and sanding it with my big drum sanding machine, I cut the panel to its final size and fit it to the door.
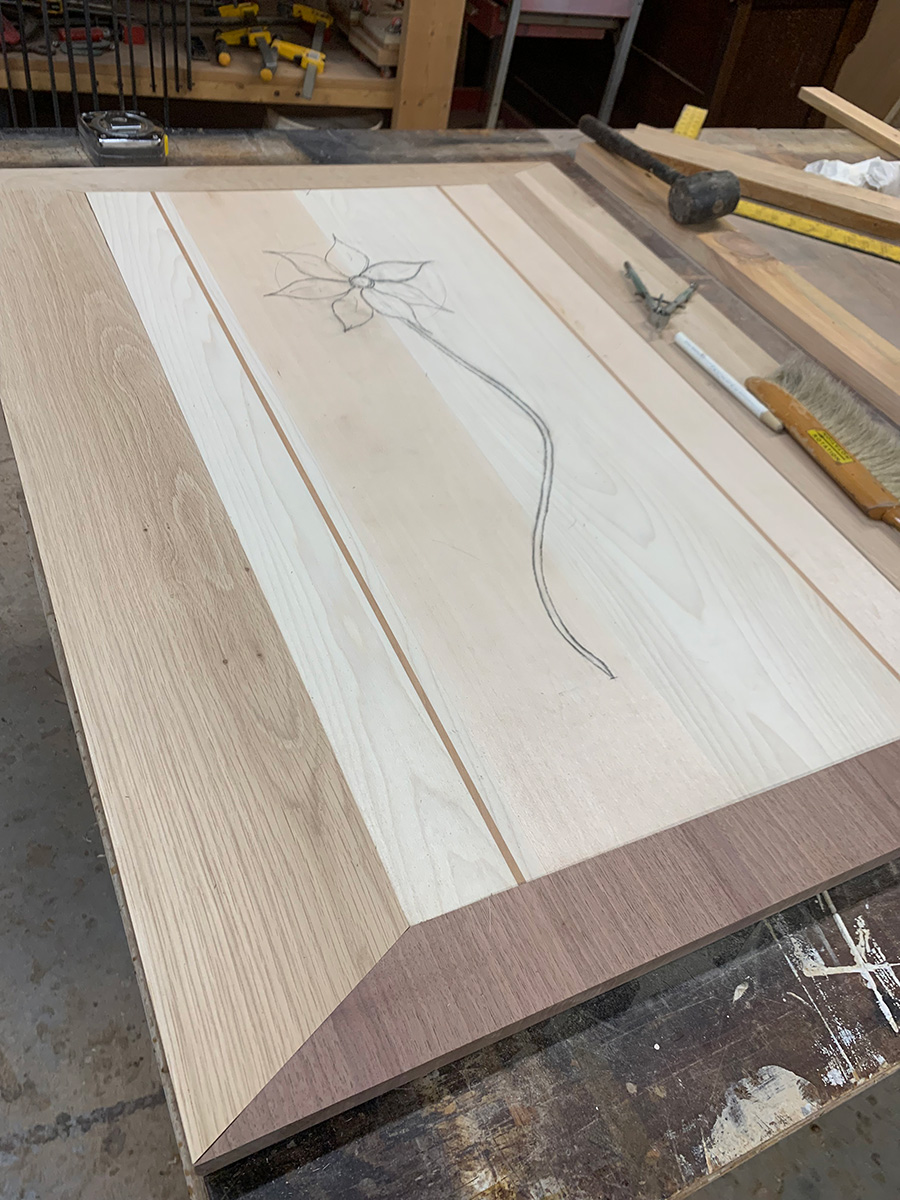
Then I started the carving.
This panel is all handcarved. First I carved out the vines along the sides. Then I filled them with three values of green epoxy, swirled a little. After the epoxy cured I sanded it, grading up to about a #220 or finer sandpaper. In one place I sanded all the way through the green epoxy to the underlying basswood. I was able to repair this by simply taking a charcoal pencil and giving it a couple of good clean strokes. You would think that a black line pieced into a green vine would show like crazy. It does not. Our eyes often see what we expect to see, so when people look at this carving, they invariably see green even where it is black charcoal pencil. There is likely some sort of life or spiritual lesson in this but I have yet to figure it out.
Once the vines were complete, it was time to carve the flower from my drawing. There was no way to transfer the large flower from my vellum drawing to the panel. But the advantage of having drawn (and redrawn) that flower, stem, and leaves was that my eye could easily tell my hands how to execute the work on the door panel.
Once it was drawn, I used a sharp V chisel to cut the shape. It really was not very difficult and anybody who has carved a little could have done it.
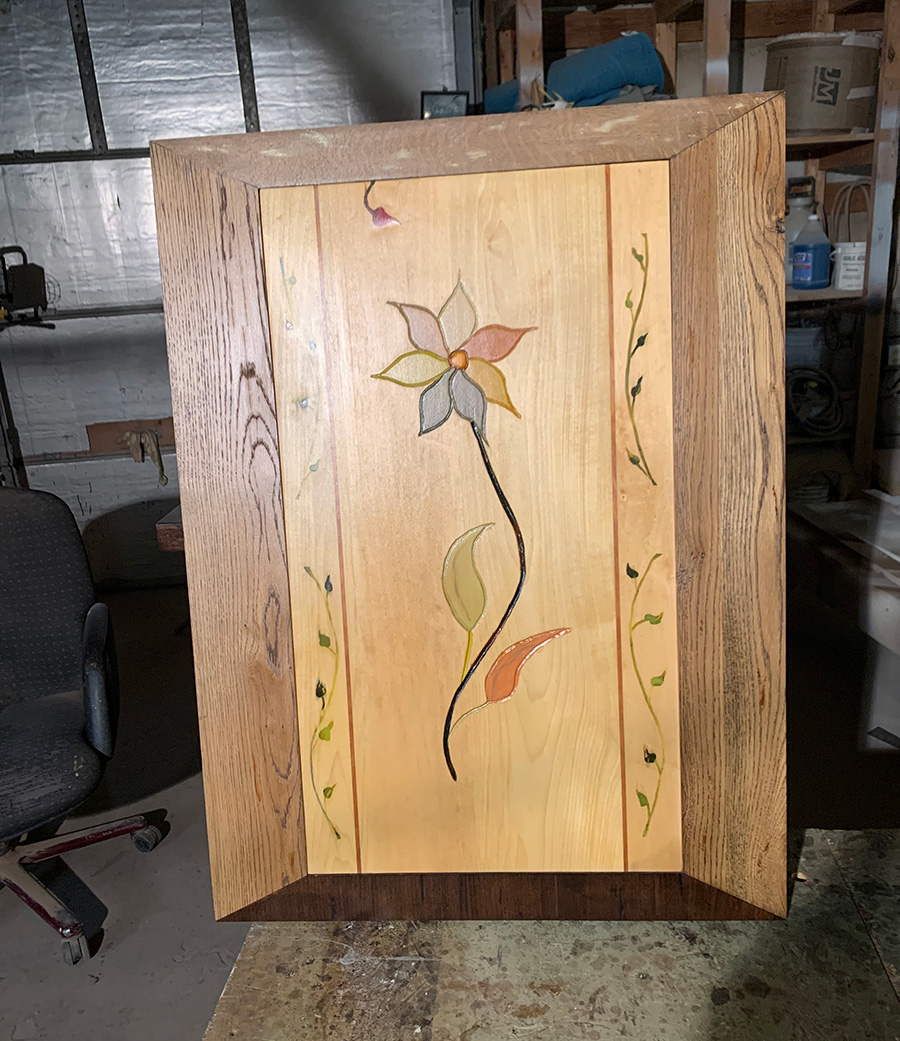
After the carving was done it was time for color. I used artist oils. If you mix primary colors with gray, you get pastels. I used pastels because I wanted the piece to have softness and simplicity. The stem in a dark color provided contrast.
Finally, to finish the panel, I clear coated the entire piece with Waterlox brand marine, tung oil finish. The marine connotation indicates the finish will protect the substrate from water and sun damage.
I installed the panel in the door and created the faux window sill and the surrounding wood trims. Oh, and I signed, dated, and folded that vellum original drawing and placed it behind the art panel inside the door. Maybe some guy a hundred years from now…
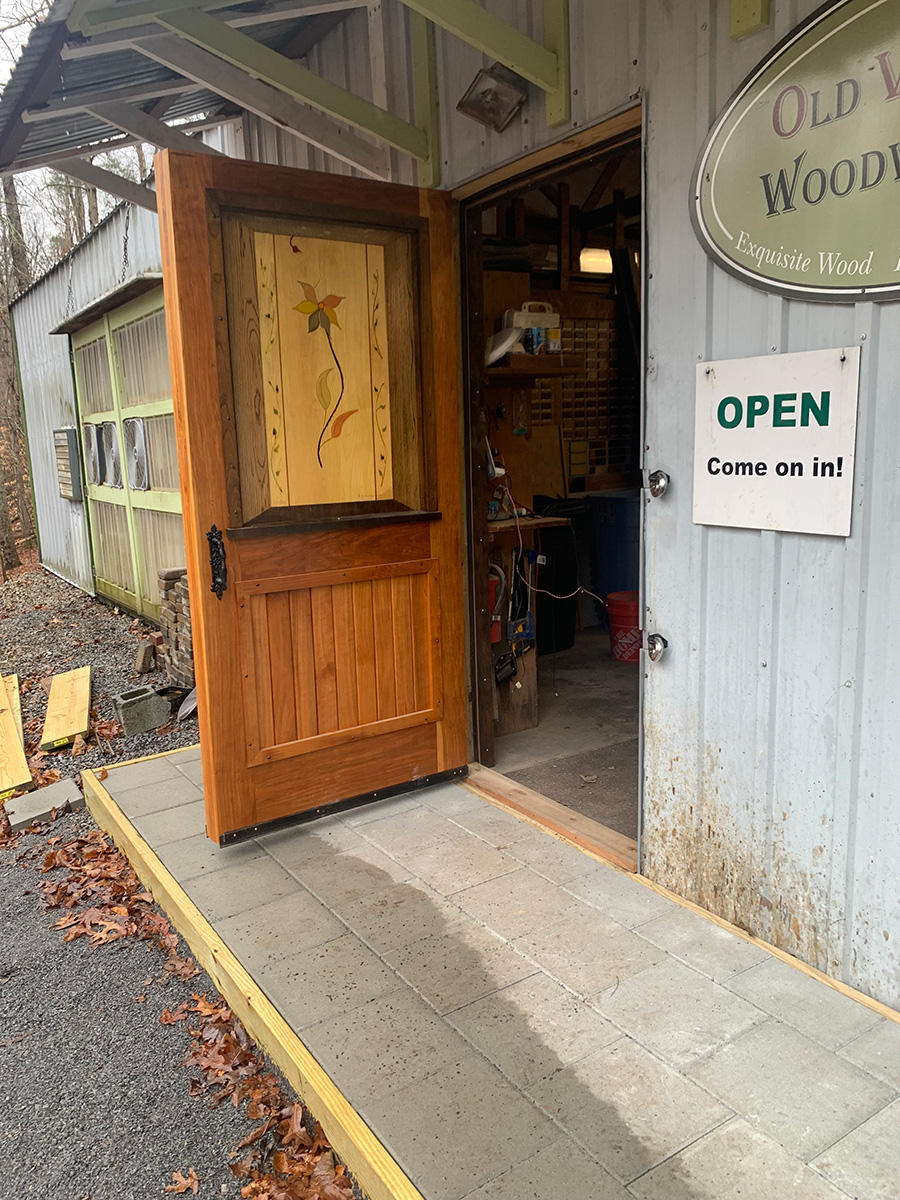
Then the door (all three or four hundred pounds of it) was ready to hang.
We used four, 6” steel, ball bearing hinges. I routed the hinge locations on the door, placed the hinges, and we hoisted it to its current position. This was no small feat considering its hefty weight. But there it hangs now, welcoming each customer who brings their antique pieces here for restoration and refinishing.
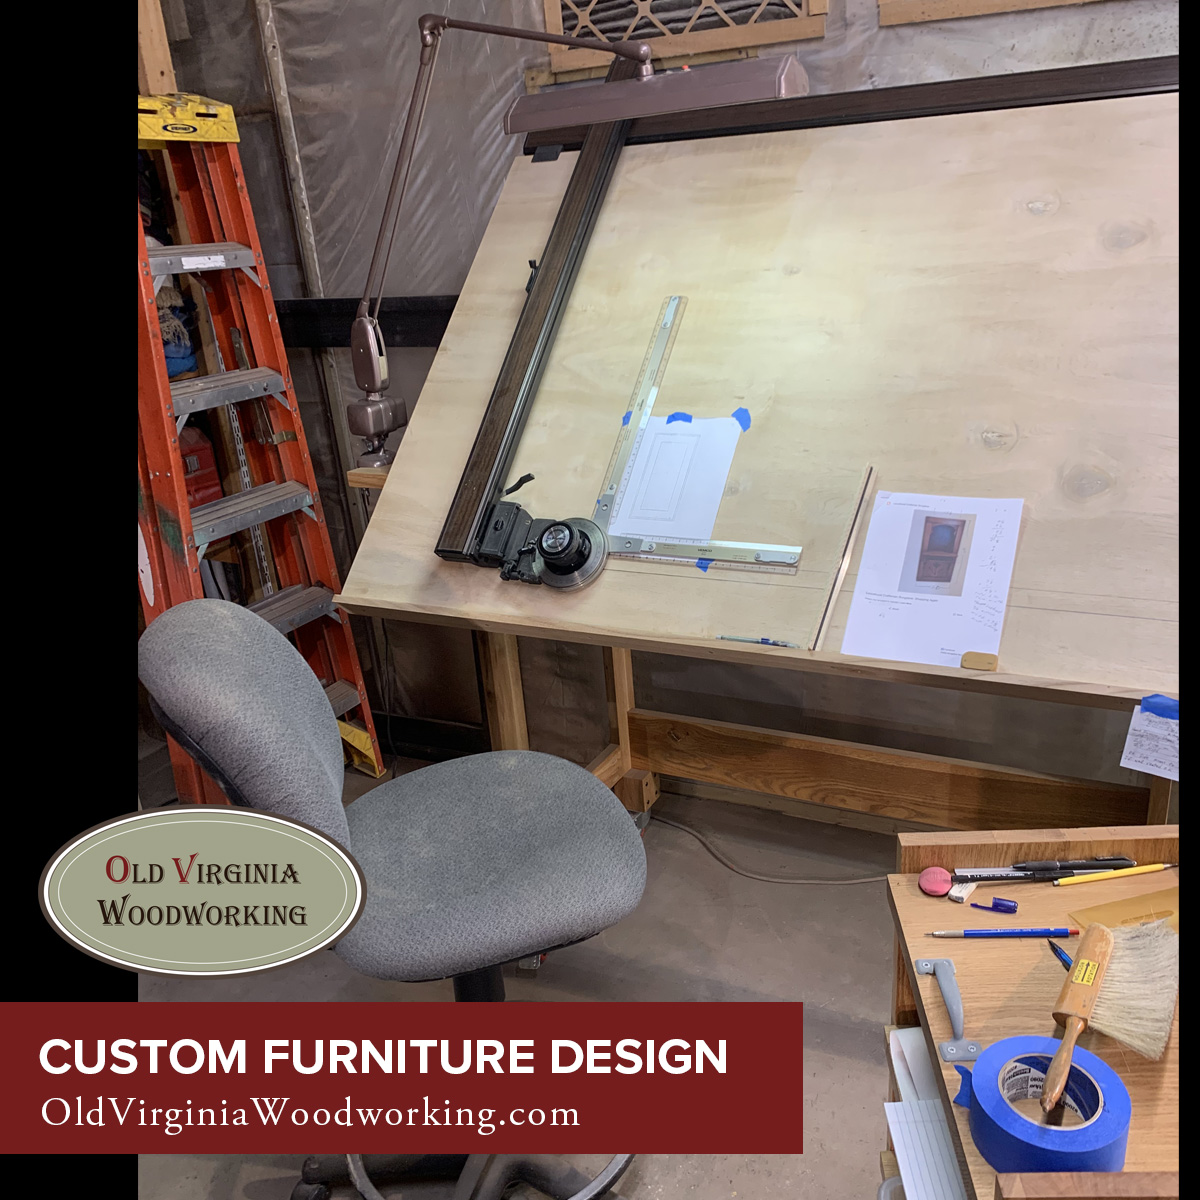
My first drafting training was in carpentry school over fifty years ago. Back then the work was done with a collection of hand tools and a T square working off the side of the drafting table.
Eventually, a business partner of mine showed me how to draw with a ‘modern’ drafting arm–the type with two rotating elbows that just kind of folded out over the table. That worked pretty well for about four decades. Eventually though, that (now old) drafting arm, just plain wore out. I threw it in the trash and geared up to buy another one.
I was soon discouraged to find that in the United States you cannot buy mechanical drafting arms any more. Computer Aided Drawing has (almost) entirely taken over the market. I do not know anything about computer drawing and so was left aghast! What does an old guy have to do just to get a drawing made these days? I started poking around on eBay.
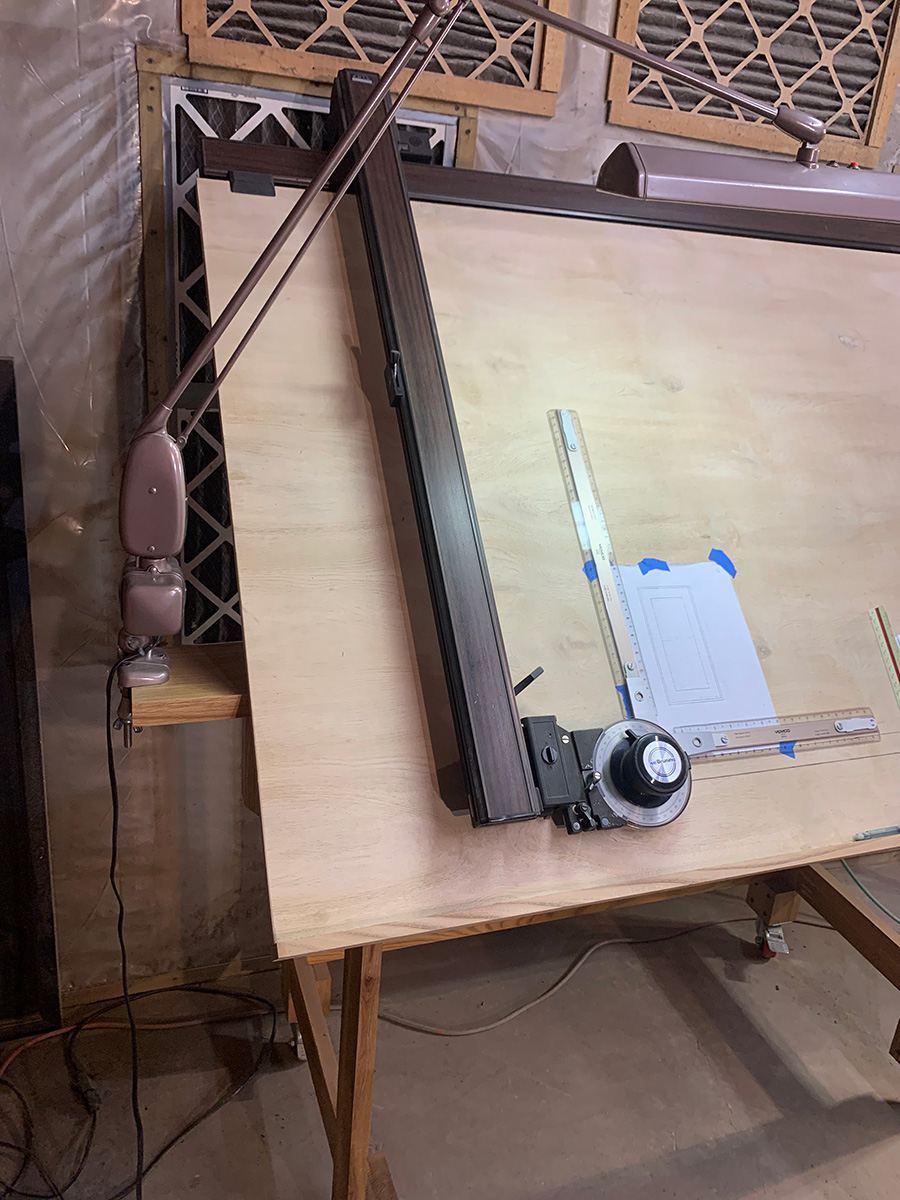
To my delight I discovered a used drafting machine available. It was advertised as the drafting machine only–no table. I bought it for a few hundred dollars and it arrived in good shape. This is a different type of machine than any I ever used. It has a steel track at the top and the vertical drafting arm rolls on that track. Then there is a drafting head with normal rulers that travels up or down that vertical beam. It has a protractor head that turns to any degree you like. It is hard to describe with words but you can see it in the photos.
The craft and skill (and art) of furniture design
This winter I built a drafting board and the stand for that board from a new sheet of plywood and some salvaged white oak lumber from a failed personal project of setting up a three-season greenhouse with raised beds. I learned I am not a farmer, I am a woodworker!
For the drawing board, I bought four locking casters so the unit can be turned here and there as needed. I love this new-to-me drafting machine and custom drafting board. Sure, it is old fashioned but so am I, I guess.
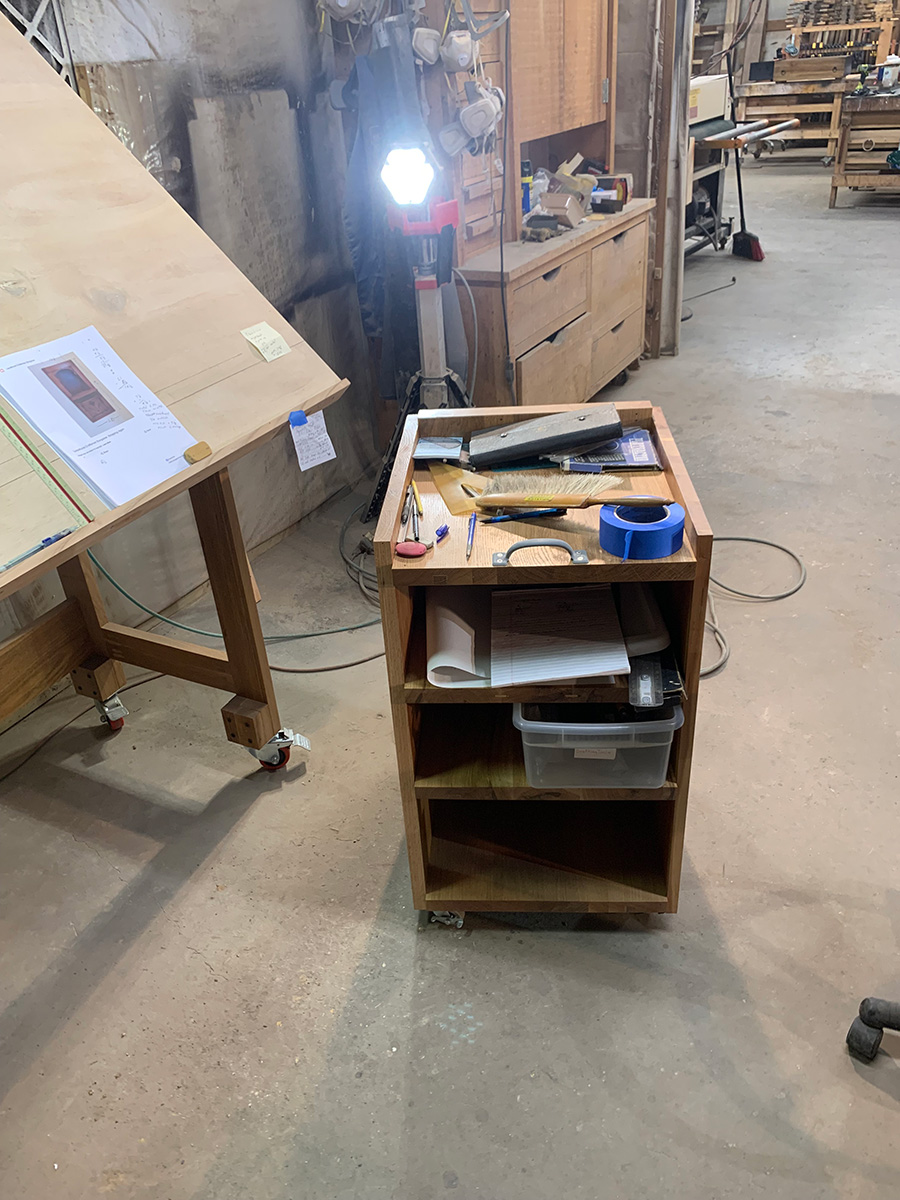
I used a gaggle of old, solid wood panels we had lying around the shop to build a new drafting cart as well to hold the other tools of my trade. The panels were thick and heavy so the cart could maybe someday be used to anchor an aircraft carrier. Well, things in a woodshop must be sturdy.
One thing I have experienced since I launched into furniture building and refinishing over twenty years ago, is this. By creating hand drawn drawings my customers often make comments like “OH–you are an artist!” which is pretty nice praise for a guy who just does old fashioned drafting.
I am not a marvel of modern production. I was made over seventy years ago and, with a little tinkering and repairs, likely can last quite a while longer. The drafting machine will probably outlast me. In any case, I am blessed to still be working with my hands, I am blessed to have two good guys to assist in the shop. And now, I am double-blessed to have this good old machine to make our products better and my life easier.
Custom woodworking can take a lot of unexpected directions sometimes.
This railing is for a restoration project in our area. The new piece of railing needed is less than four feet long and the rail profile is not available. In fact the goose neck on the original railing appears to be hand made which is what we will do also.
Often times we can reproduce old moldings and woodworking with machine made parts that are very close to the original moldings. But once in a while we have to carve or otherwise replicate antique woodwork.
I wanted to play around a bit with this project and tried the draw knife to shape the curves on this oval rail profile. Once carved to a close shape the rail will be sanded smooth and ready for paint.
Antique Woodwork Keeps Things Interesting
One interesting aspect of the work will be the need to fit this oval railing goose neck directly into a ball on the top of one newel post. I told the architect that this joint would likely be the most difficult I ever had to make in my nearly 50 years of carpentry and woodworking. I am planning to hand carve that joint and maybe we can make a time lapsed video to demonstrate our hoped for success.
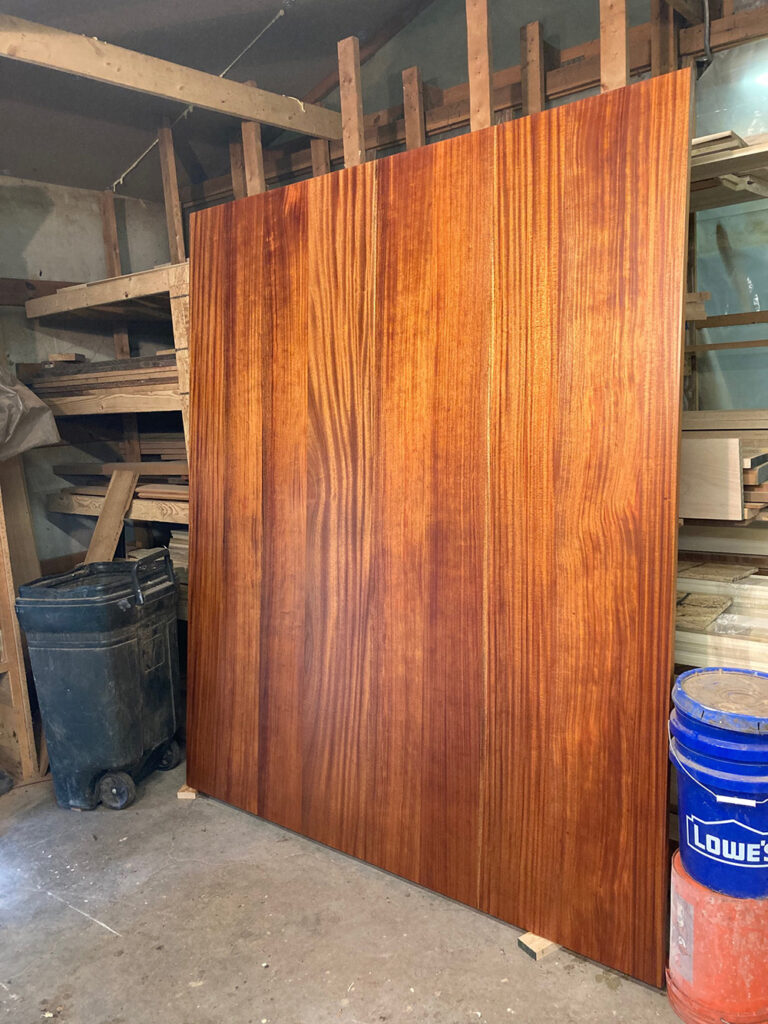
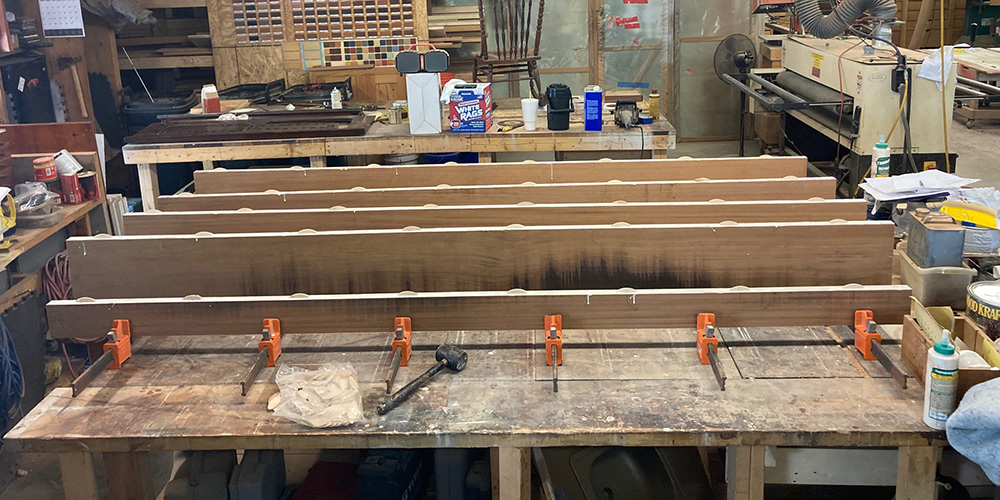
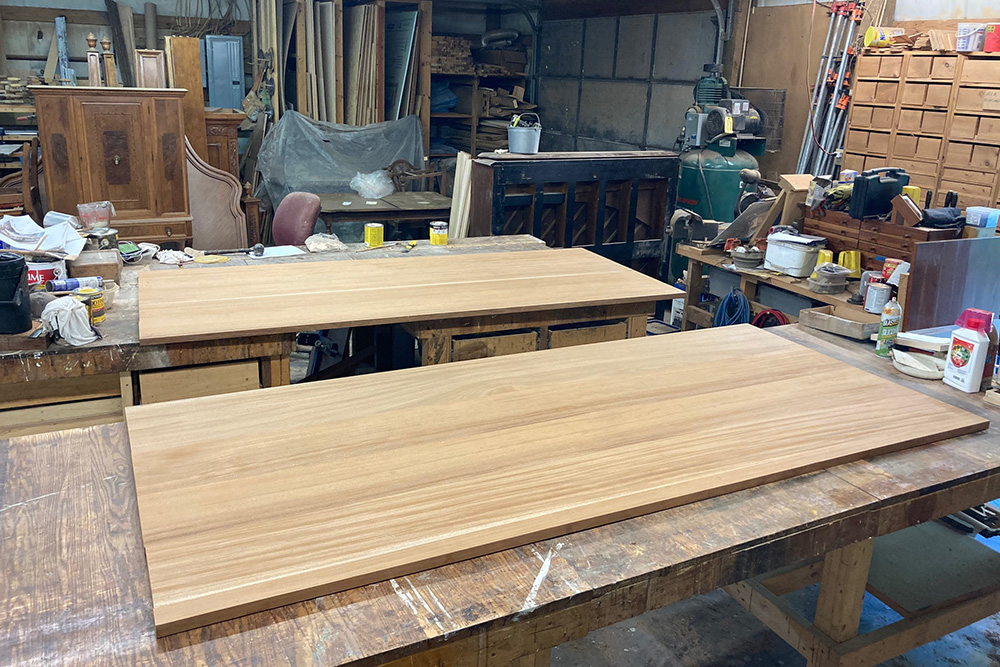
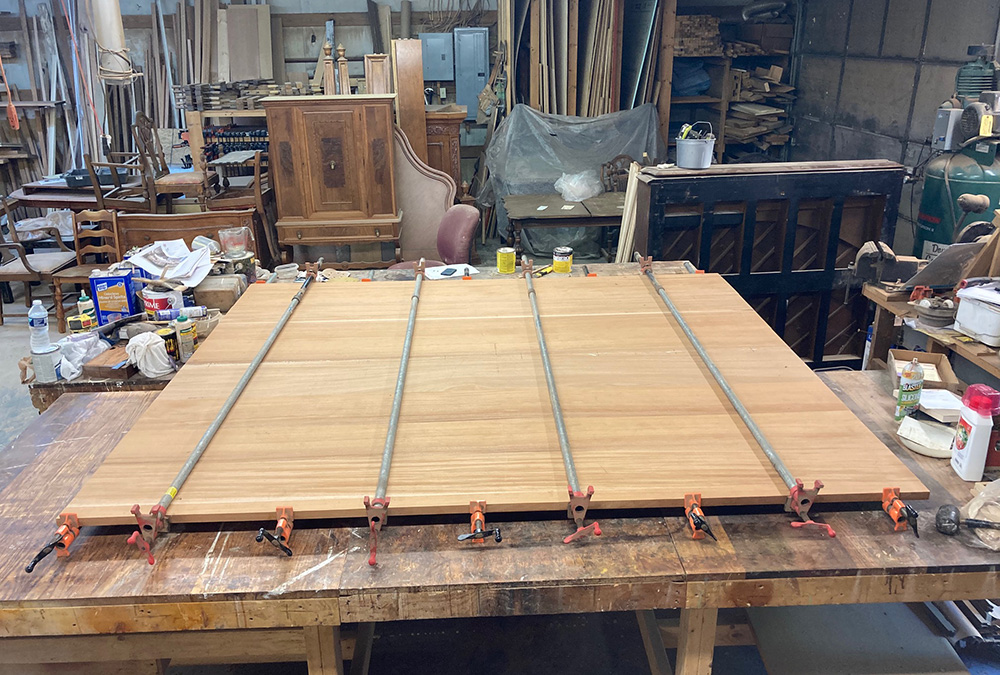
This huge panel is the largest single panel of wood we have ever made – approximately 6’ x 8’. The wood is quarter sawn African Mahogany and finished at a full 1” thick.
Finished custom mahogany panel
It was an amazing project. Too large to be sanded in our 50” wide sander it was built in two pieces, sanded by machine, and then glued together. All final finishing was by hand.
Gluing up the mahogany boards
Built in two pieces because the size was so large
Gluing and clamping the two panels together
Custom wood panel at its finished size. Finish was applied as the final step.
This big, new wood panel was not part of our restoration woodworking or custom moldings panoply. It is a stand alone piece that was designed to cover a huge hole in a customer’s shop wall and as a decorative touch for his business. It took four of us to get it lifted onto his trailer. Normally, one of the considerations in building wood slab like this is that a wood slab with no inset panels can expand and contract considerably with changes in weather and humidity. But in this case there will be no problem because the slab is not being used as a door or movable in any way.
Our woodworking takes many interesting twists and turns since each project is custom. Not everything we build is for historic renovation. In the case of this giant panel the ummm heavy lifting was done mostly by my shop manager and former apprentice, Tim.
Many viewers may wonder what the purpose is in priming wood. Why bother priming when you can simply paint a couple of coats and be done with it?
Primer helps with several possible painting problems at once.
Primer has plenty of solids in it which block the underlying color, figure, and grain of the wood. If you hate painted wood then this seems like a bad thing. But if your goal in painting is to hide the wood look and gain an even color surface, then primer is your friend. In this case we used white primer but your paint supplier often can tint the primer toward the final paint color thus adding to the primer’s ability to hide the underlying surface (substrate in painter’s professional lingo).
Primer is designed to bond to that substrate better than paint: and excellent bonding is highly important in most paint projects. Who, after all, wants their new paint to be peeling and flaking? Additionally, paint will bond to primer better than to bare wood. The primer provides the bonding both to the underlying surface and it provides a good surface for paint to stick to.
Plus — Primer dries hard enough that it can be sanded to a silky smooth surface prior to painting. This gives the painter a superior clean, smooth surface to apply paint. If you want a professional paint project then take the time to prime the wood, sand the surface, and then apply a couple coats of the best quality paint.
When I first bought this molder/planer the idea of making moldings seemed interesting. I had no idea how to get started. But like many skills we have learned we simply needed a little push. When I was asked to make moldings for a local restoration project I simply said ‘yes’ figuring I would just have to learn.
Custom Cutters
It was actually not difficult to get the custom cutters made and to create the moldings. To get the correct cutters for various shapes I traced the ends of the desired molding on a piece of white paper. Then I added measurements and dimensions. My wife makes the drawings into a computer file I can forward to the moldings knife maker. We pay by debit card. The custom knives show up in the mail about ten days later. Custom moldings, voila!
Learning the Quirks of New Tools
If you are thinking about making custom, architectural, moldings there are a number of things you need to figure out, or at least try to figure out. One thing I discovered with my first order is that with these planer/molders in the planer mode the cutter head has three blades. In the molder mode you normally have only one cutter with two counter balances to make the cutter head run smoothly. The point of all this is to note that you will have to feed the materials through the machine at about 1/3 speed to get good surfaces on your wood moldings. If you want to run materials through the machine at full speed then you need to buy three matched blades for that particular molding. For small runs the cost of buying three matched blades is prohibitive.
When it comes to work and careers I believe many of us drift into our careers with little attention to long term kingdom building intention. Maybe we choose a type of work because it will pay a lot of money. Perchance we simply drift into whatever career is easiest to attain or perhaps we try to find work that is personally enjoyable. Motivations are often mixed but, I think, rarely evaluated against biblical ideals for work.
The Bible is for the Work Week
What! You say; there are biblical ideals for planning our work and careers? Most of us have never heard a sermon or read a book discussing any biblical directions for career and work so where can we find such instructions?
The Bible has a lot to say about work. There is a ten chapter section that we could title Wisdom for Work. It is found in the book of Exodus chapters 31-40. The first characters (ummmm – Characters and Careers – could make a good title) mentioned are a couple of guys with peculiar Bibley names: Bezalel and Oholiab. Being a Schanzenbach I suppose I ought not get too exercised over other people’s peculiar names (Oh, when I type the word Bibley the spell check indicates it is not a word. But we all know it is a word and we have a sense of what it means even though we may not be able to write out a flawless definition of it. So we can not let spell check deter us from using perfectly good words.) But I have drifted from my discussion about Bezalel and Oholiab.
Learning from a Guy Named Bezalel
These two guys were appointed by God to direct and perform the building of the Jewish tabernacle that was used during Israel’s forty years of wandering through the wilderness. The tabernacle was an artistic house for God. The work involved casting precious metals, engraving, stone cutting and setting, weaving and dying cloth, making garments, and embroidery and other skilled work. The master craftsman overseeing the project was Bezalel and his apprentice was Oholiab. Our text introduces them:
Now the LORD spoke to Moses, saying, “See, I have called by name Bezalel, the son of Uri, the son of Hur, of the tribe of Judah. “I have filled him with the Spirit of God in wisdom, in understanding, in knowledge, and in all kinds of craftsmanship, to make artistic designs for work in gold, in silver, and in bronze, and in the cutting of stones for settings, and in the carving of wood, that he may work in all kinds of craftsmanship. “And behold, I Myself have appointed with him Oholiab, the son of Ahisamach, of the tribe of Dan; and in the hearts of all who are skillful I have put skill, that they may make all that I have commanded you (Exodus 31: 1-6).
And the text lets us know what these craftsmen were supposed to be working on:
the tent of meeting, and the ark of testimony, and the mercy seat upon it, and all the furniture of the tent, the table also and its utensils, and the pure gold lampstand with all its utensils, and the altar of incense, the altar of burnt offering also with all its utensils, and the laver and its stand, the woven garments as well, and the holy garments for Aaron the priest, and the garments of his sons, with which to carry on their priesthood; the anointing oil also, and the fragrant incense for the holy place, they are to make them according to all that I have commanded you” (Exodus 31:7-11).
When we read that the Lord called by name Bezalel we must understand that this is an example for all of us. Not that we are called to do the same work as Bezalel but that God calls us by name to accomplish specific work for His kingdom. That specific work requires focused skills which the Lord also provides. Scripture explains,
“I have filled him with the Spirit of God in wisdom, in understanding, in knowledge, and in all kinds of craftsmanship…”
So Bezalel received the Spirit of God to do specific work. Now, he likely labored hard to develop his skills, but ultimately, it was the Lord who filled him with the Spirit of God in wisdom and all kinds of craftsmanship.
Discover & Use Your Talents
It seems to me that we ought to expect that God has filled all believers with His Spirit of wisdom and craftsmanship to complete our earthly callings. This Scripture passage is for our instruction and application (2 Timothy 3:16). God does not send us out empty handed. We ought to be working from our youth to discover our God-given talents and gifts and expect that the Lord will use us in His kingdom work. This is a basic minimum belief (for women as well by the way) needed to live the gifted and called life God has for us.
When Tim and I were working on those big doors installing the Edura Trilennium hardware we were working at the edge of our gifts, skills, and talents. I worked for years to gain the knowledge and skills needed to perform that work. Yet it is the Lord who receives all the credit and glory for granting the life and opportunities, gifts and talents needed to complete my (our) calling. So if it is big doors, big tables, computer codes, managing a household, or whatever the skill needed, all is to be done by God’s grace and to His glory. God gives us each our gifts and we owe Him praise for this.
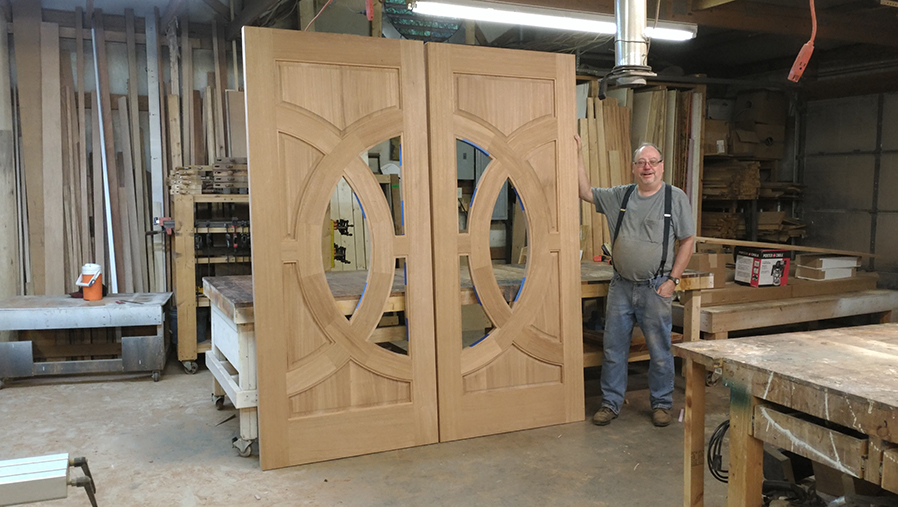
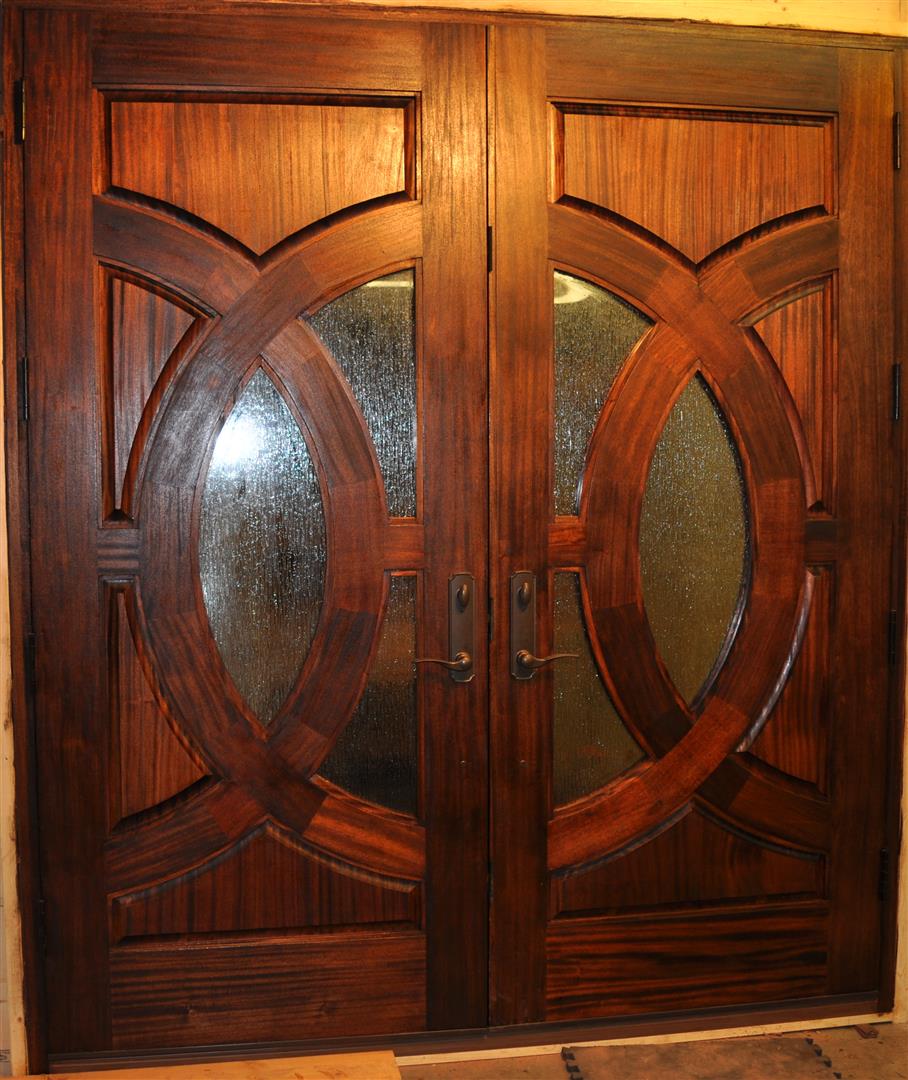
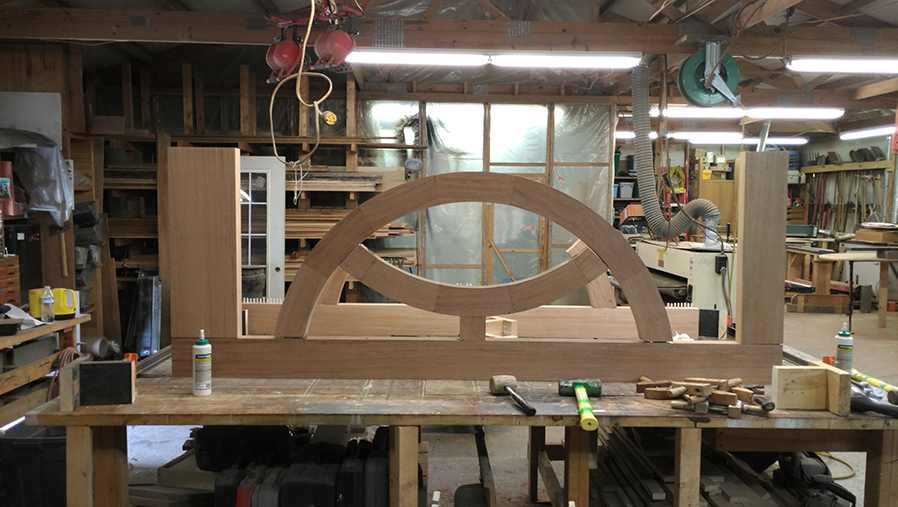
We spent two weeks working nearly all waking hours to complete the big doors. These massive custom doors were a huge project for such a tiny shop. The size of the pieces was certainly huge, though there were only three (two huge doors and one double-huge door frame), but it was the intensity of labor and endless fine details that made this a big project. Each of these heavy, double doors measure 8’ high by 40” wide each by 2-1/4” thick solid African mahogany. They have curved, raised panels, curved glass panels and curved frame and trims, curves everywhere.
Apprentice Tim cutting curves with our custom curve cutting contraption.
Always Ready for a Challenge
But the most difficult part for us was the wonderful Endura Trilennium® locking system hardware chosen by the customer. The active panel of the double door system has a five point locking mechanism that operates three bolts into the inactive panel along with head and foot bolts as well. Kachunk—multiple CLICK, when that door closes. This is the best locking system I have ever seen. It took quite a bit of our time to figure out everything about the installation.
We, with our customer’s strong help, purchased the routing guide package to router out the edges of the door for this hardware brand. It was kind of a big deal around here. Tim spent a lot of time figuring it all out. He routered a practice piece first and then went to it on the doors. I told him I was responsible if anything went wrong. Nothing went wrong. Everything fit. Tim is great with these kinds of projects and he excelled on this.
Suspender Man™ showing off the door project progress.
Am I a Craftsman or a Preacher?
It was a really busy couple of weeks. All through it, however, I was thinking about how to actively disciple my apprentice. Just how does a craftsman communicate his best ethics and his best thoughts about being a Christian businessman to his apprentice? If I preach big gobs of unsolicited advice I am going to be ignored or worse, hated, and despised as a crack pot or someone detestable I am certain.
Talking is plenty useful but it has to be practiced within the proper framework. I am starting to think that I ought to tell (warn?) my apprentice that I will be sharing any spiritual insights I have, with him, just as a general heads up. If I had, from the beginning, let him know that I was going to do this it would have been better all around. It is not to late to tell him now though. For the sake of honesty I think I will tell him that I am going to share spiritual insights as a normal part of his training. That way he will understand more clearly the direction I am taking this relationship. For, I am remembering that, “When a student is fully taught he will be just like his teacher.”
I rarely write Shop Notes on Sundays. Sundays are reserved for rest (“Six days you shall do all your labor”). But a couple weeks ago every aspect of life got turned on its head when we were thrown a curve ball in the form of eight (or was it nine?) power outages. Granted a few were only 30-90 minutes in length but others lasted several hours. Everything felt upside down.
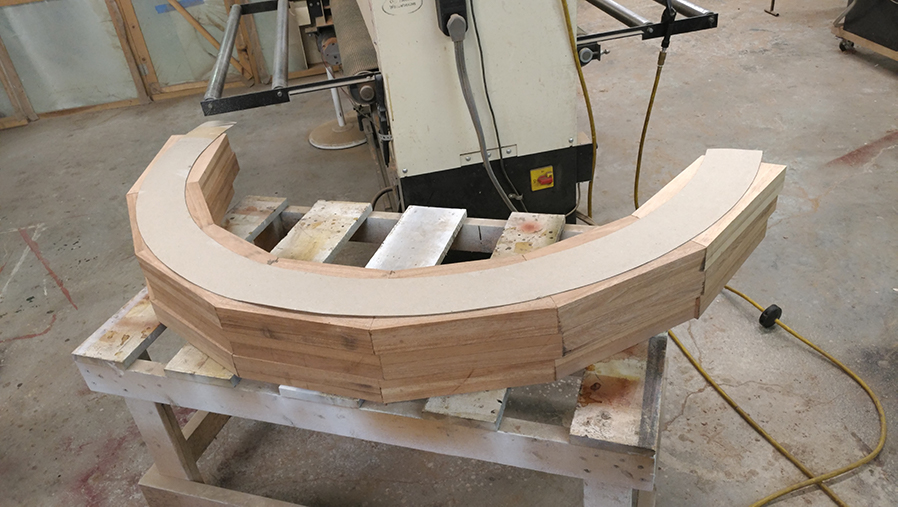
Custom Mahogany Curves
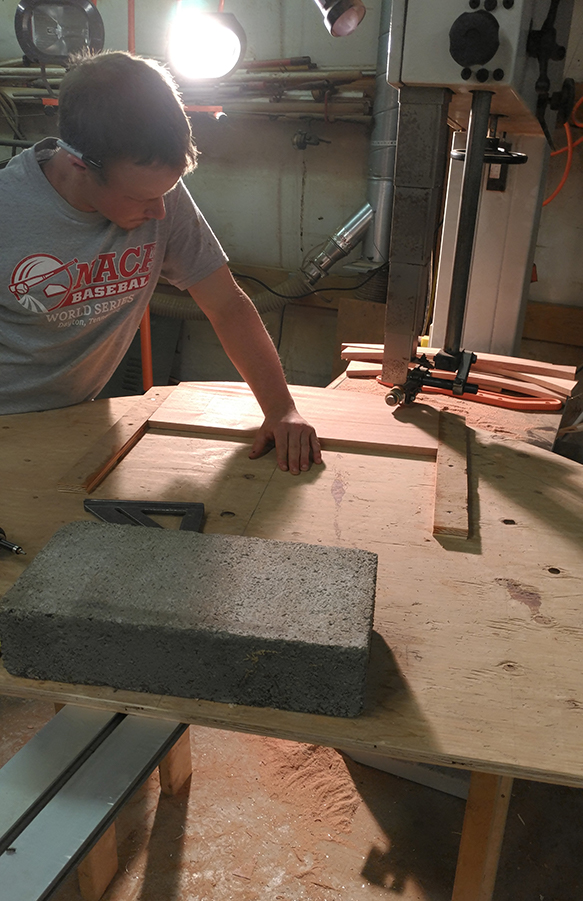
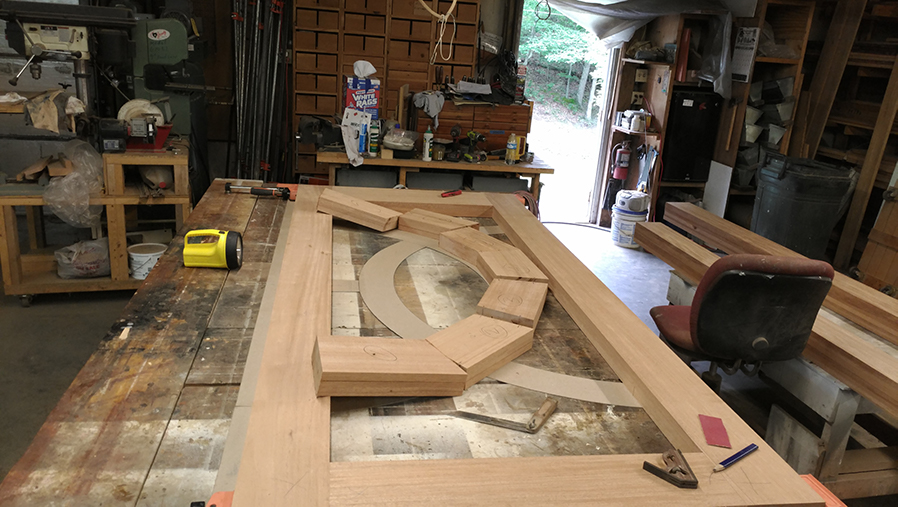
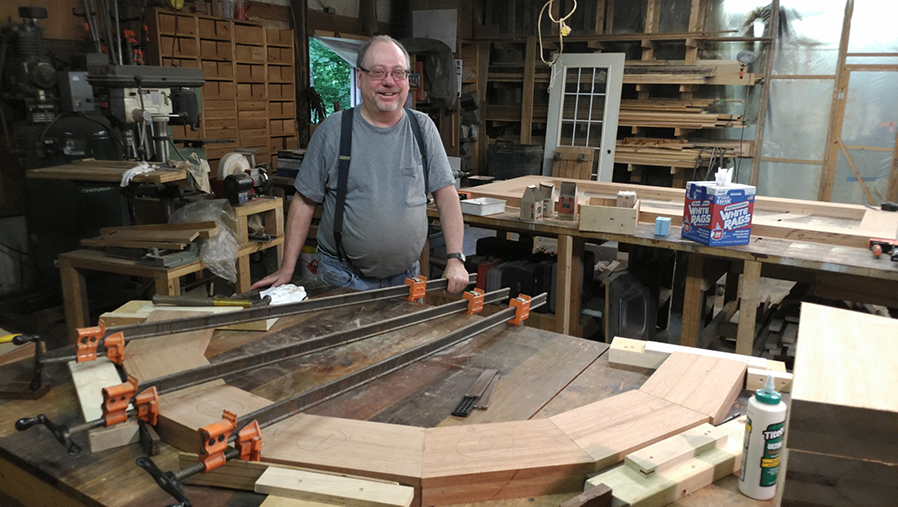
I spent our working hours teaching Tim how to build the 56” diameter curved pieces needed to build this set of custom exterior doors. The doors, when installed, will create a big circle in the center with half of the circle in each door. The inside of the circle is made up of odd shaped glass panels.
Laying out the glued up mahogany blocks to build our curves.
Suspender Man™ working some clamping magic to get a sturdy, tight set of curves before cutting them to their final shape.
Projects & Problem-Solving
This project is complicated to build and I am guessing and by-goshing my way through it as I go. I have allowed Tim to see that is what I am doing. He might as well understand that I sometimes must figure processes out as I go. Every business owner faces this same reality. Nobody knows how to do everything they contract to do.
My apprentice may as well see this side of reality. He ought to understand that owning a small business involves taking risks (measured risks but risks just the same). He needs to see the agonies as well as the easier aspects of owning a business. He will, after all, have to learn how to navigate similar waters when he is the master craftsman.
Curves ready for cutting to fit our custom exterior doors.
Apprentice Tim using the bandsaw to shape the mahogany curves.
Growing Our Knowledge & Building the Future
This reminds me of a thought: I want my apprentice to catch the vision for training another person to do his work and take his place in God’s economy. We are not put on earth to simply provide for ourselves. We also need to help other people learn to be masters in God’s kingdom. We must pull other people along teaching them skills and a biblical philosophy needed to take dominion (Genesis 2) and push forward God’s kingdom in every field. This is a distinctively Christian enterprise and practice.
The humanists of our age (or any age) have nothing to match the biblical apprenticeship model. Their idea for teaching is to impart endless gobs of book knowledge, or of personal philosophy disguised as book knowledge, and to take captive the upcoming generation through their “philosophy and vain deceit” (Colossians 2:8). Ours is to disciple people in the means and methods required to take dominion of the earth and to push forward the crown rights of King Jesus. We live for different purposes and achieve those purposes through differing means. Christian discipleship and apprenticeship do not look like the humanist alternative which most of our students labor under. So, I guess, this is where this week’s curves and curve balls conversation has taken us. I do not always know where I am going to land when I launch these conversations.
Once the curves are cut, the assembly of these custom doors begins!