Antique Clock — “A surprise for Dad”

Antique clock repair and refinish project

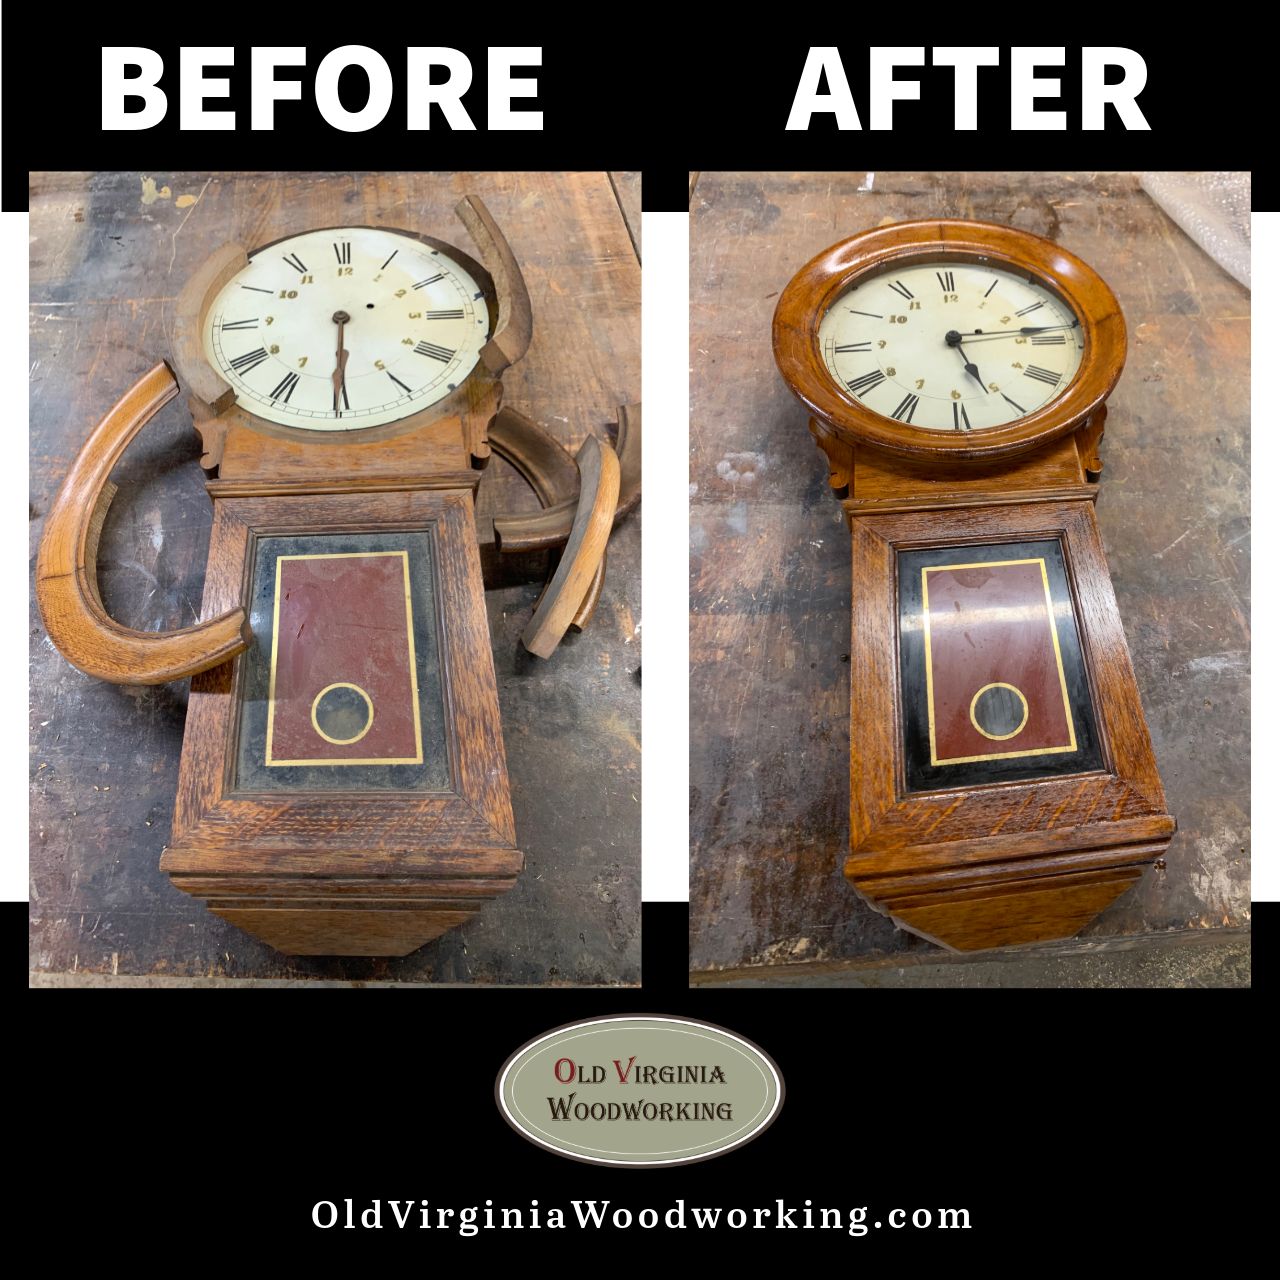
This clock came into the shop as a rebuild and refinish project. The lady who brought it in wanted two pieces (a desk and the clock) completed. They were surprises for her father who she mentioned ‘is about your age’. The desk was a piece he made as his first woodworking project in high school. It got pretty beat up and broken after over five decades. To my regret, I forgot to take any photos of the desk. I often forget to take photos. It’s the kind of deal where you kick yourself in the shins for being forgetful. Nevertheless, we did get several photos of the clock along the way.

Some assembly required

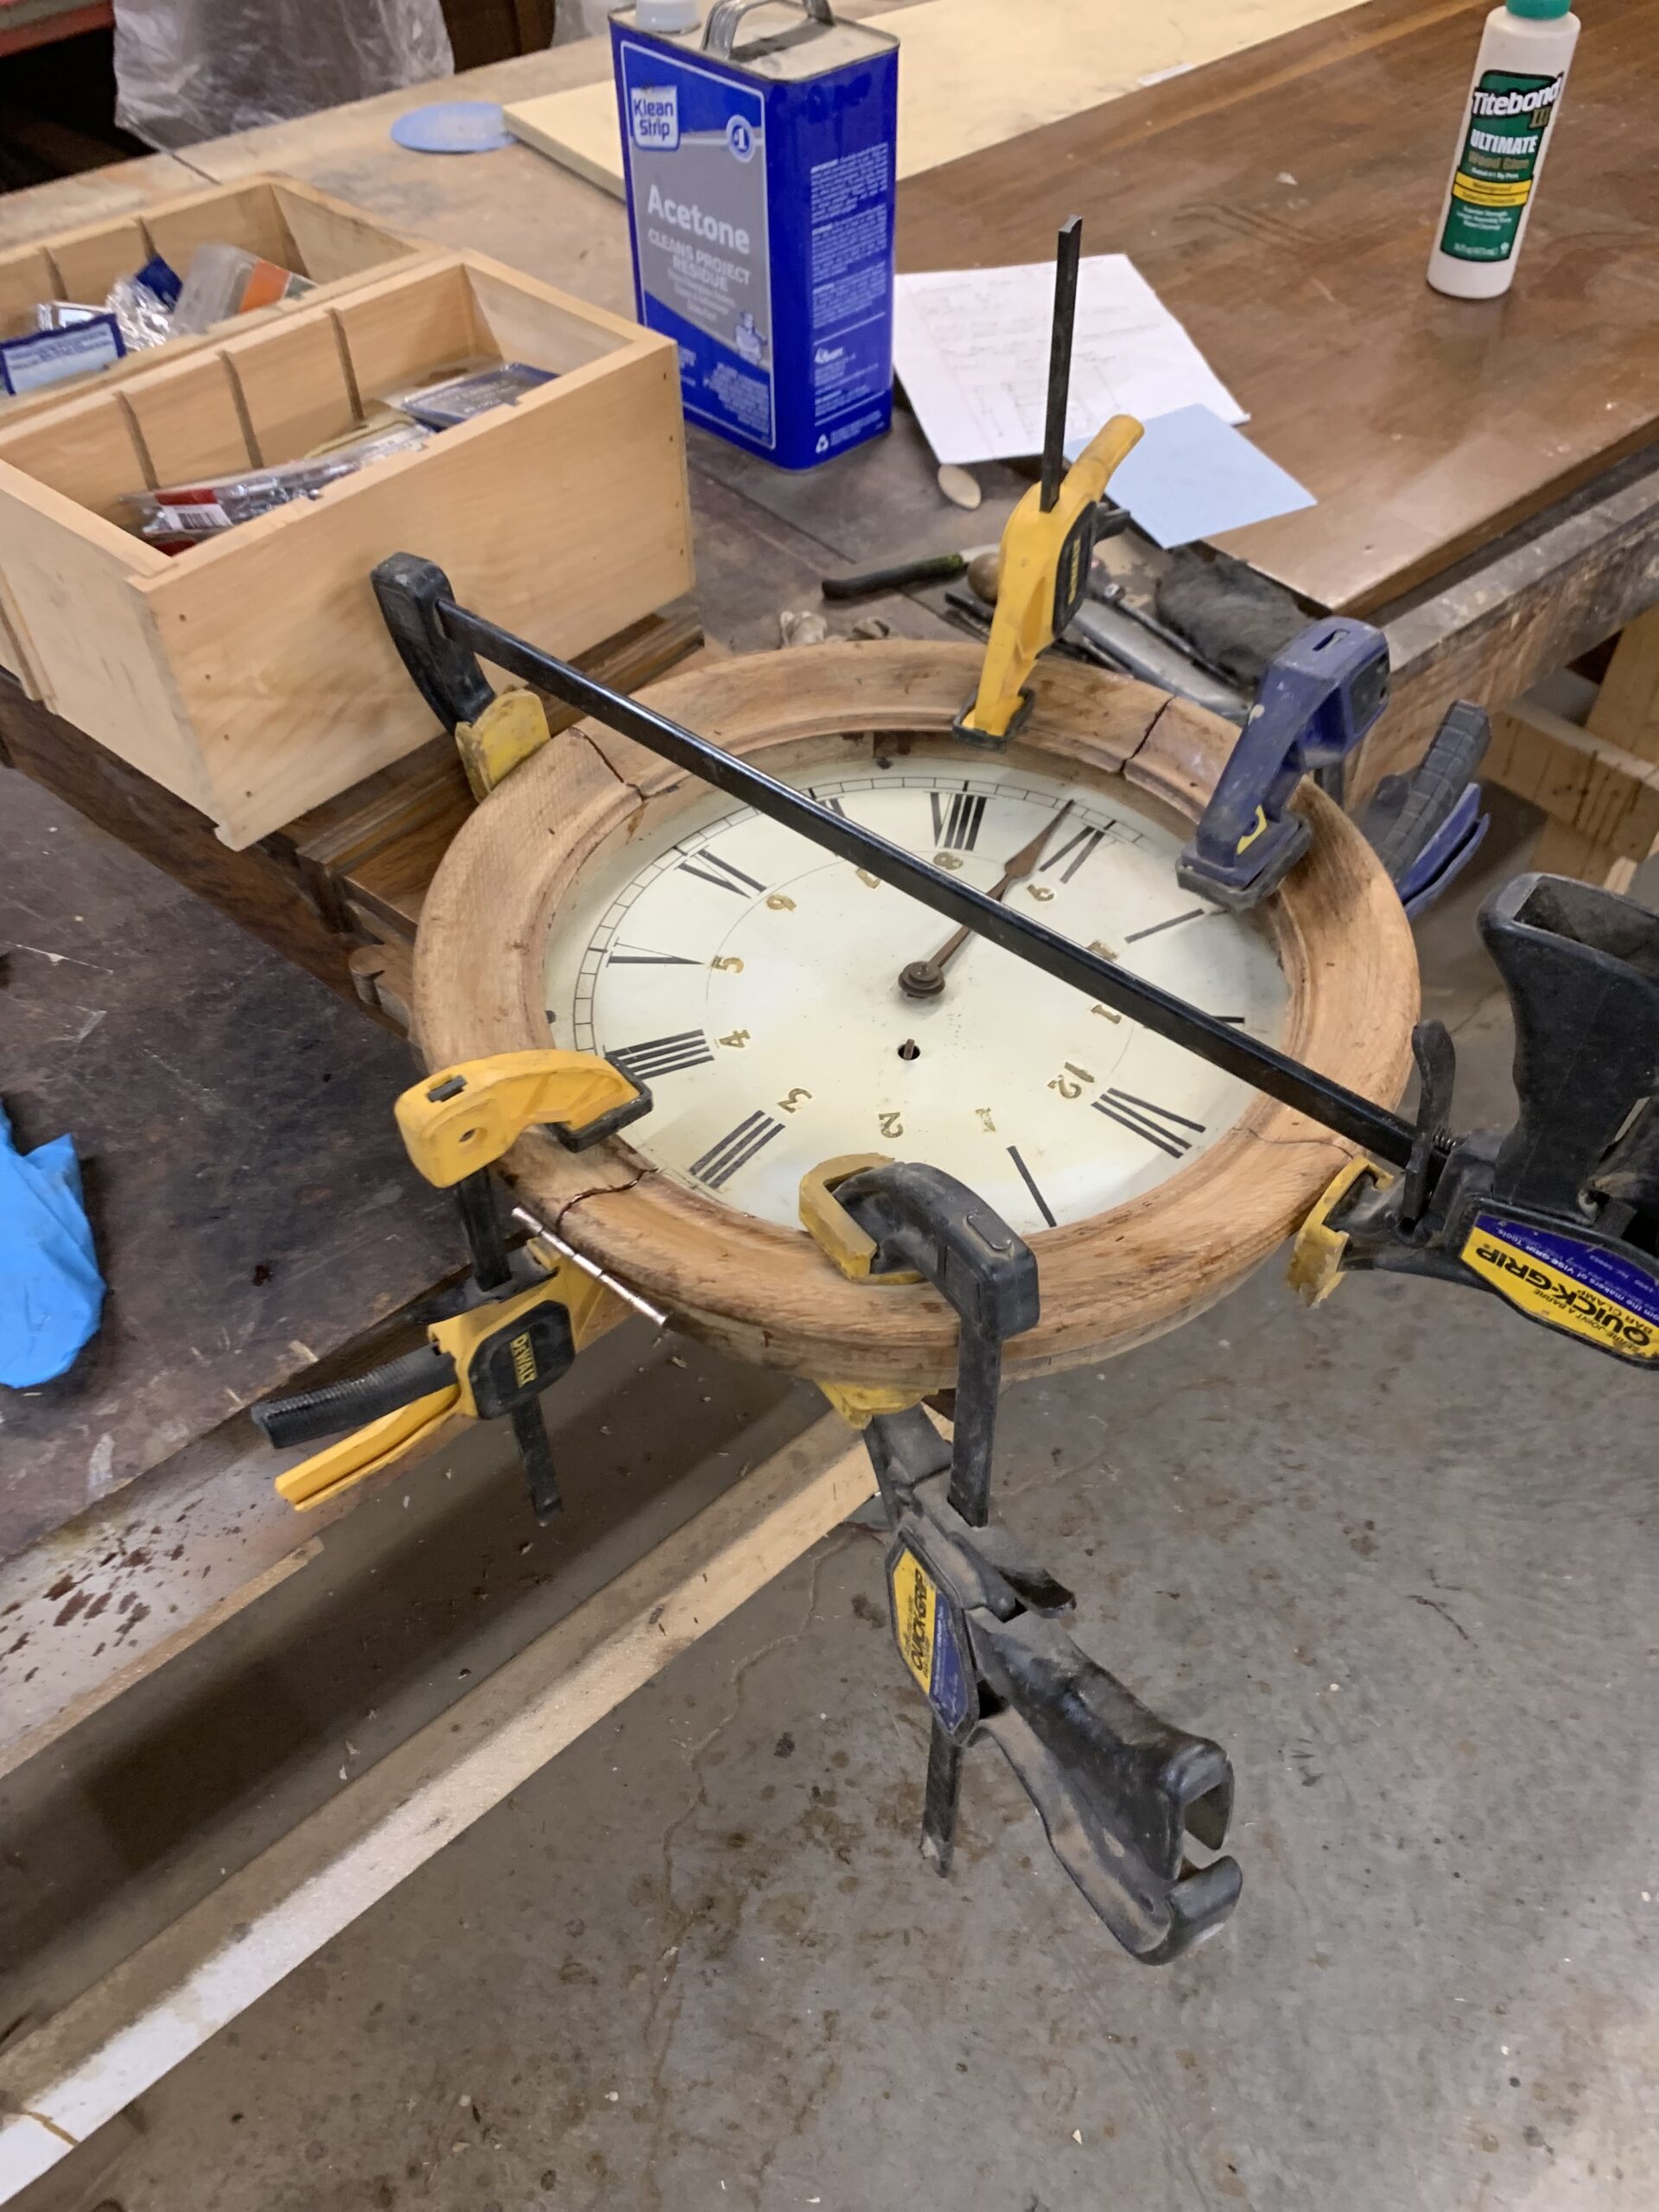
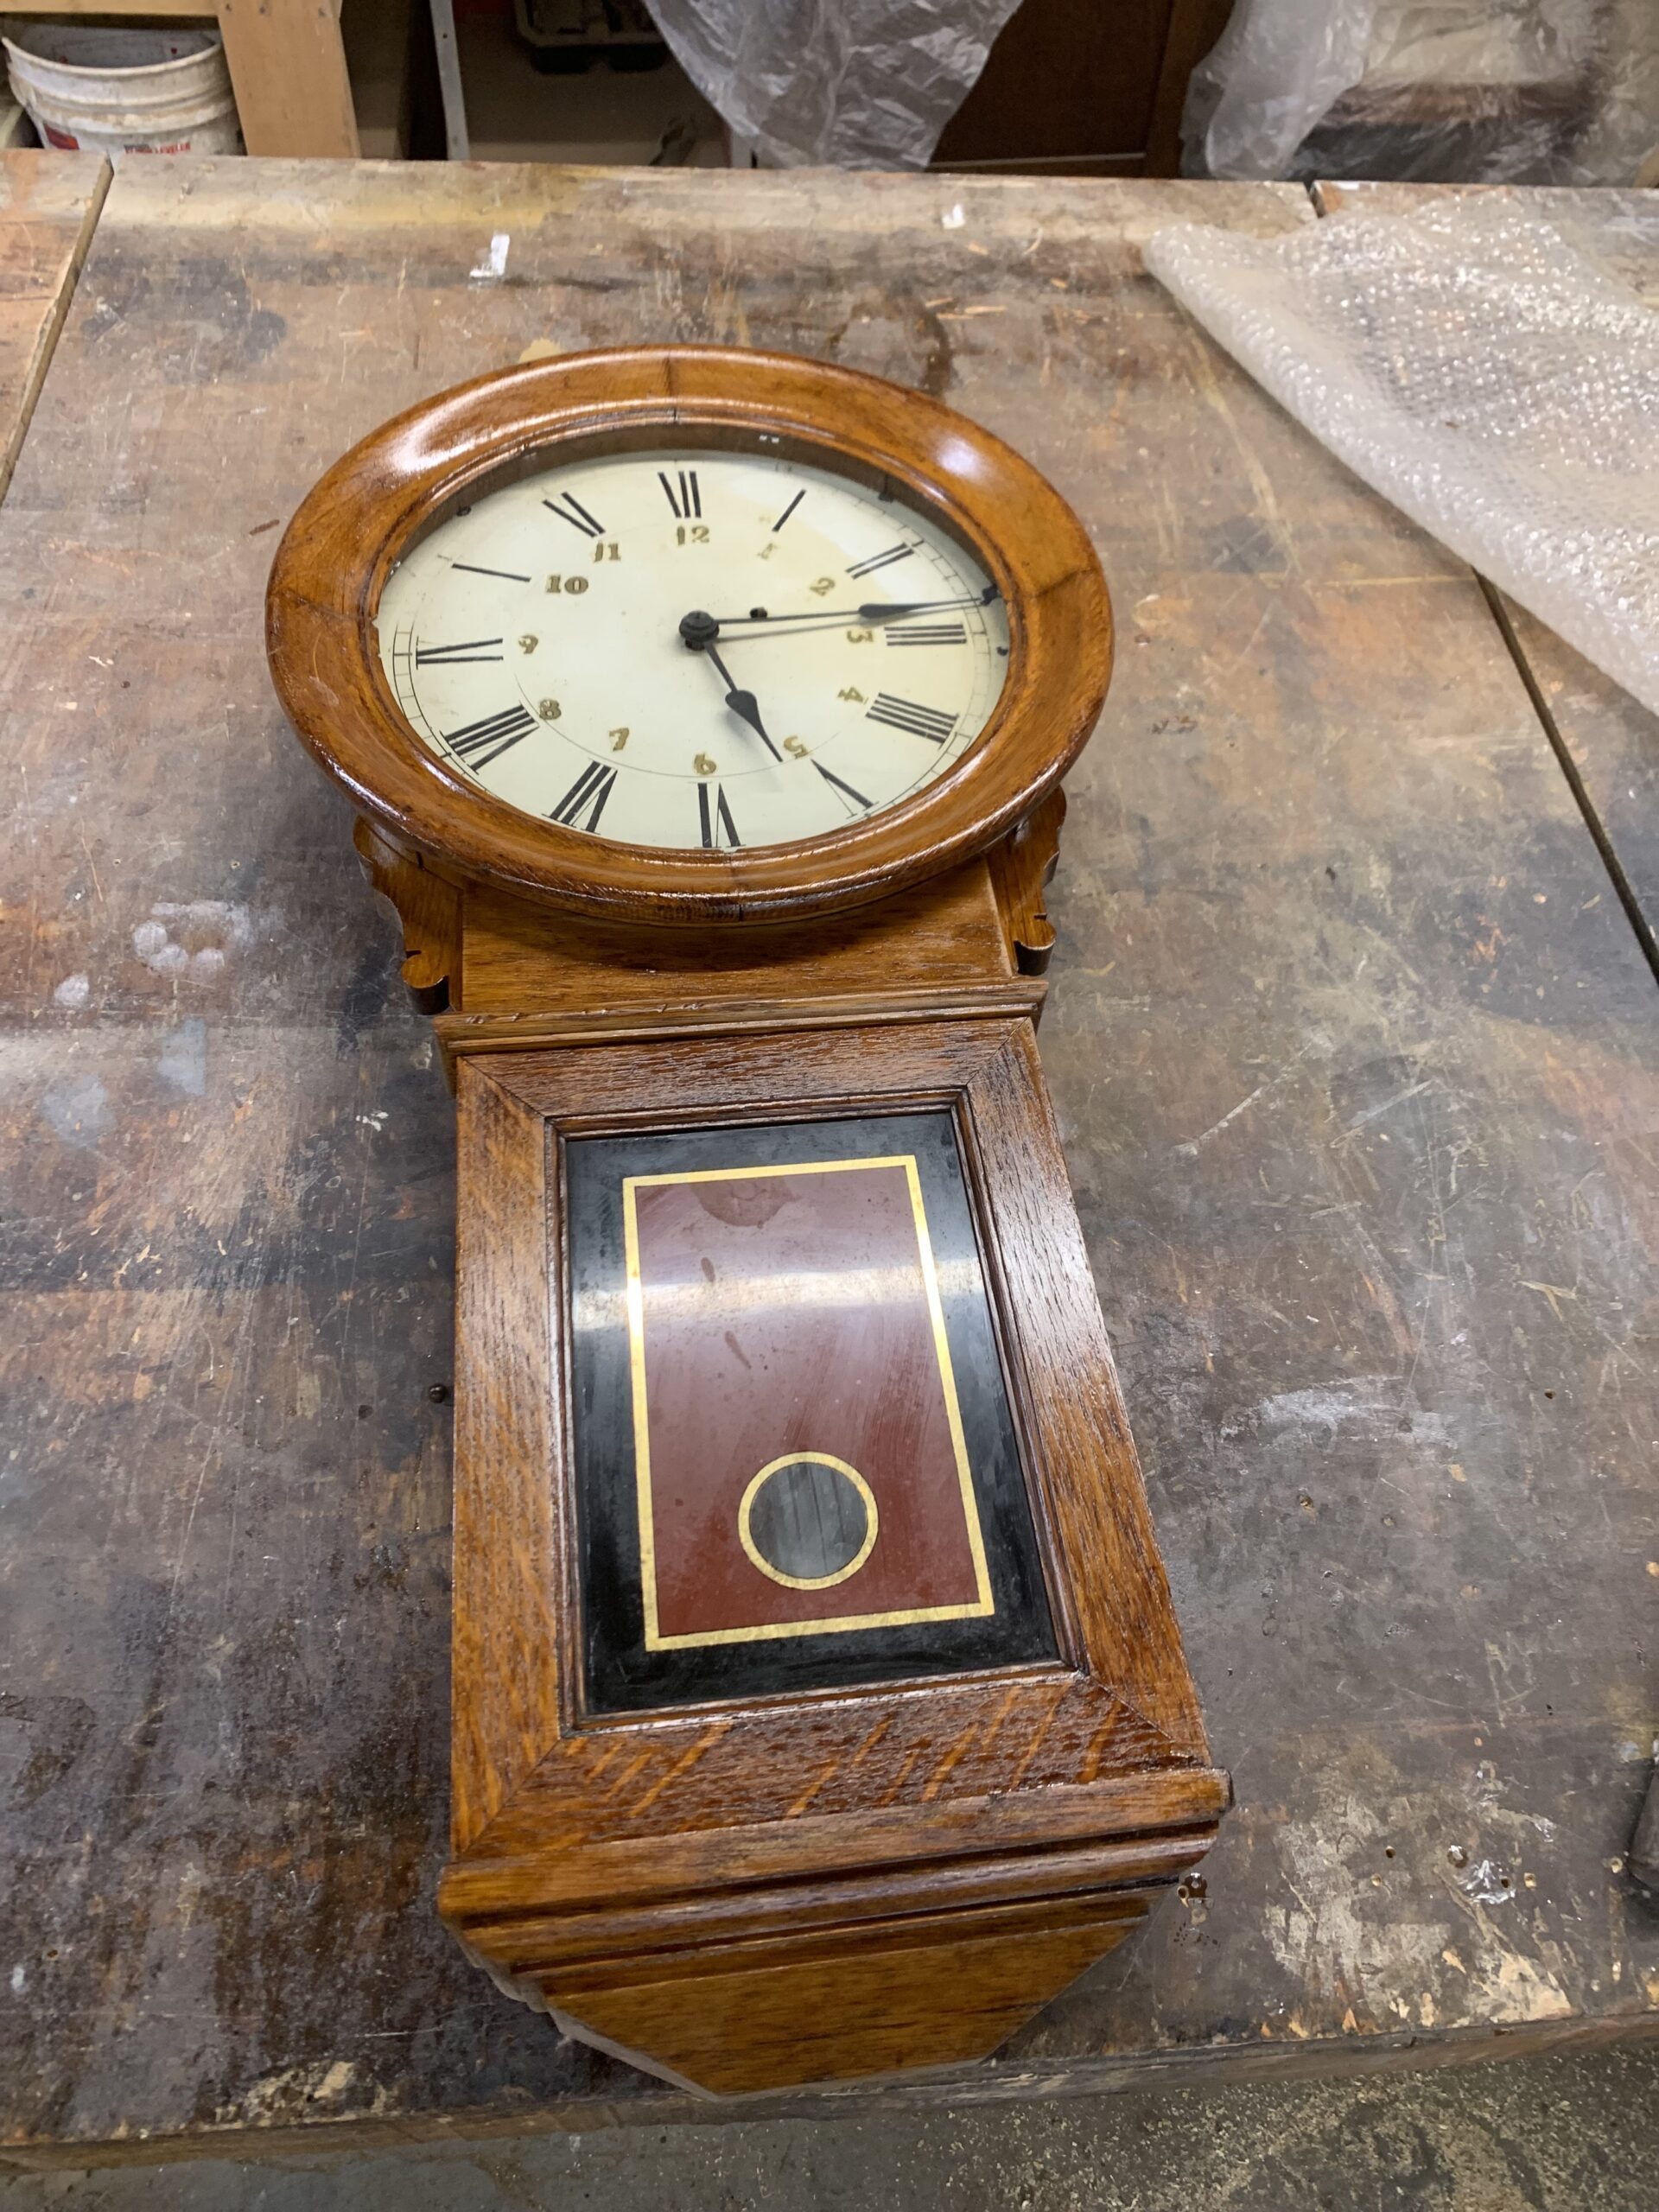
The clock was to be a birthday present for her father. When the lady packed that pile of pieces in and stacked them on my workbench it was a little hard to tell how to reassemble the broken-up thing. All the trims around the clock face were broken off, the old glue kind of dissolved I guess.

When I went to work on it I picked around here and there trying to figure out how those pieces went back together. I found a black lump along the left side and started picking at it. That was when I discovered it was a hinge! Man, it was completely frozen in time. I soaked it in solvents and scrubbed it with fine steel wool. It started to budge a little, then it crept open. Eventually that hinge worked like new and the original finish was still pretty good under all the gunk. So, I figured out that the loose clock trims actually assembled into a round door for the clockface.

A facelift for this antique beauty

There was no glass in that clockface door but I found traces of old finish and a couple of those tiny steel triangles, called glaziers’ points, that they used to use to hold glass into an opening. You can still buy those and I stock them in my shop. I priced the cost of that 12-1/8” diameter glass and found it so cheap I just told the guy to make it. Then I contacted the customer and asked her if she wanted to get glass for that door for under $18, bring it to my shop, and I would install it for free. She was thrilled.

The new glass fit perfect when it arrived. I popped it in place, tapped a few glaziers’ points behind it, and voila, that 150-year-old clock sure came to life. I am guessing now that the original clock door assembly probably had a bead of glazier’s compound packed in around the edge of the glass. I never even thought about that until the unit had been picked up and gone.

The pre-repairs clock face was stained and dirty and it looked pretty bad. The challenge was to clean off the grime without damaging the original numeral decals and background white paint. I started cleaning with mild soapy water but that accomplished nothing. Then I tried my most trusted general cleaner, paint thinner. One thing I like about paint thinner is that is dissolves a wide variety of dirty marks and residues but has never, in my experience, damaged an underlying solid surface or even carpet. It was, however, another failed effort. That dirty face remained solidly soiled.

The next strongest cleaner in my refinisher’s chemical resources is brush cleaner. Brush cleaner is pretty potent. It’s highly flammable (think gasoline), smells strong, and it sure burns if you get it in an open cut – it also dissolves all the thinner plastic and nitrile gloves in the shop. The good news is that with some careful scrubbing with 00 steel wool the old paint splatters and shellac finish messes started to loosen up and go away. It came out pretty clean, though not like new. After a while the decal numerals began to wash away so it was time to quit that business. I am certain you can still buy those decals new but my customer did not want that.

Looking sharp!

Oh—you might wonder why an old clock would have a hinged door over the clock face. The reason is that the clock had to be wound up to work. The key hole for winding was in the clockface and the door was there to protect both the clockface and to allow access to the keyhole.

The project turned out nicely and the customer was brightly happy. She mentioned, now that the clock case was all restored, it looked sharp enough that maybe she would try to find someone to repair the clock’s works. I am certain there are guys out there who can do that repair. But this old guy (her father’s age) will leave that for somebody with clockwork’s repair experience.


Furniture Repair: Fire & Water Damage

This dining room set was nearly ruined in a house fire.

We completely repaired and restored this oak dining table and chairs, considerably damaged in a house fire.

Fire and Water Damaged Furniture

When we received this dining table and chairs from the restoration crew, one end of the table was broken off by the collapse of a water soaked ceiling and insulation. Three of the chairs were so water damaged that the seats fell apart into multiple pieces. Water had literally washed/soaked away about a third of the finishes on this dining set. The baby chair had a leg burned black at the lower end. It was in rough shape.

Refinishing this dining set, however, is exactly the kind of challenge we enjoy! There is always something satisfying about being able to strip and refinish a large dining table. The transformation is pretty fun to see.

Refinishing and Repair Techniques

The chair seats were broken into several pieces and had to be re-glued, sanded smooth, and refinished.

One chair had a rung missing so I had our favorite wood turner custom make one to match the existing rungs. We installed the new custom rung and when the project was complete you would never know one rung had been replaced.

Once we get to spraying the professional finish on table tops, one of the things I like to do to make the finish shine is to spray on two or three coats of sanding sealer, instead of just one coat, before I apply any top clear coats. Sanding sealer in multiple layers gives the table top finish some nice depth.

In the end this restored and refinished dining set turned out great, and should be good for a few decades or at least until the next house fire.


Rebuild and Restoration of Hoosier Cabinet

Restoring a Hoosier Cabinet

When we restore and refurbish an old cabinet like this we can get into a wide variety of work. If the cabinet was made after about 1920 or so it could have cheap veneer plywood sides, bottom, and back.

These plywood panels soak up humidity or direct water from rain or other sources. Then the glue lets go between the veneers and the entire piece needs to be replaced. Sometimes you can simply remove the outer layer of the plywood and replace that layer with new veneer. An old iron can help. You use it to heat up the layer of peeling veneer and the heat softens the glue, and bingo, off comes the old veneer.

The new veneer has to be cut with care using a pattern. Then use contact cement to glue down the new veneer. It may sound hard but it is really easy. This Sellers cabinet is really just a variety of Hoosier cabinets but it was a cheap knock off made mostly of poplar wood, a wood which needs to be painted for It rarely looks good stained and varnished.

The best way to get the roll top desk to roll properly is, simply, to work it repeatedly until all the hidden paint crumbs break loose and the track clears enough to let the top move properly.

Don’t be afraid to try it and restore your Hoosier or Sellers Cabinet to its former glory!

Completing the Restoration of a Hoosier Cabinet

The first video we posted up above shows you know how tough this cabinet looked when we began. It was literally falling into parts on the floor. One of our most helpful products for restoring old, broken furniture is epoxy adhesive. Epoxy is tremendously strong, plus, you can add silica thickener to make it stay in the glue joints and not drool all over. Epoxy is a good filler/adhesive and fills up where broken bits of wood have gone missing.

Another trick that gets the job done faster is to use a good commercial paint stripper. Now that might sound like a bit overboard but if you ever try to use the hardware store products, well, you will be there for days with frustration to the moon. We use Benco brand paint stripper, and use rubber gloves, apron, and eye protection. Of course I can’t talk you into anything you just have to decide how many hours you want to spend to strip a cabinet.

Once cleaned up you should sand the cabinet. If you are going to paint your Hoosier Cabinet then prime it first and sand the primer. Then apply two coats of a high quality paint and, voila, you will have discovered a new hobby — or maybe discovered why people bring their furniture to guys like us for refinishing.


Couch Frame Repairs

We have many times repaired bracing for the undersides of couches and upholstered chairs. Often these good old pieces were built over a century ago. The techniques, tools, and materials by which springs support was achieved have changed over the decades. In most cases we can rework the underside of your antique spring-seat furniture to give it a long, new, refurbished life.

For some people there is a suspicion that the old wire springs are simply worn out. My experience is that this is rarely true. Typically it is the support for those springs that has given way. In most cases we can repair broken couch and chair frames back to new strength or better. And we can support those old spring seats to get them back to their original performance.

Restoration of furniture and refinishing is what we do here. Let us take a look before you toss that family heirloom.


Fix the Problem NOT the Blame

Shop Notes: Fix the Problem NOT the Blame

I assigned Tim a project rebuilding and refinishing a bookcase. It was not a huge project. The unit stands under 4’ tall and is about 3’ wide. It was probably built in the 1920s or 1930s. Originally nailed together, it was wobbly. The owner asked us to disassemble the bookcase and dowel it all together, plus other work to make the piece rigid. Installing a new back and refinishing were a part of the work.

A Faulty Furniture Fix

While inspecting the newly doweled and glued piece I discovered that it was just as shaky as when it was delivered to us. Tim performed the repairs just as I had prescribed but the fix did not fix. So whose fault is it when a project has problems? Is it the responsibility of the craftsman who made insufficient repairs? Or the boss who planned the work but did not know how poorly the work was going? Is it nobody’s fault and we just have to fix it?

The Business Owner’s Responsibility

Here is how I have learned to think about problems on the down line.

It is pretty simple really. I own the business so every problem is my fault. Now, we all understand and believe that when we have a problem with someone else’s work. Say you take your lawnmower in for repairs. After you pick up the repaired machine you get home and find the work was done poorly. Back you go to see who? The mechanic who did the work? No sir—you go to the department manager and if he won’t help you go to his manager. We all do it because we understand that the person at the top is, ultimately, responsible. And what is true for other businesses is true for mine. I am responsible for everything that happens under my care.

Christian Responsibility

As a Christian business man I am doubly responsible because the Bible teaches covenantal responsibility, sometimes for events we were not even alive to see. For instance, when the prophet Daniel prays for the return of Israel from Babylon to their land, he makes a confession of sin for their nation (Israel) and includes himself as guilty even though Daniel was not even alive when Israel committed the sins for which God punished them with Babylonian captivity.

Just Fix it—No Excuses

The point is, that we need to take responsibility for more than we think. That means I cannot push off blame for problems on my workers. I do not get to tell the customer that the worker was new and it was his fault a problem happened; so, no excuses to a customer—not ever. I try to remember that but temptation is always at the door to blame somebody else. Fixing the blame does not fix anything is a lesson I am continually learning. If I practice that morality my apprentice just might learn good behavior from me. That is called discipleship. It is one of the duties and benefits of being the master craftsman.